
Setting ceramic wall tiles
basic principals of setting out wall tiles - Jury Stick - examples of tiling and comments
The way ceramic wall tiles are set out will have a large affect upon the final result, someone looking at the finished tiling will often have an opinion as to the quality of the tiling without really knowing why, they will just know.
The guidance given here will help produce a professional looking job.
The basic principals of setting out wall tiles
These include:
- Set the tiles evenly about a horizontal feature - window, basin etc. so that equal width tiles are on both sides.
- Try to achieve a full tile height above the side of a bath/worktop.
- Where a recess is more than one tile deep, have a complete tile on the front edge.
- Keep the tiles in a recess lined up with the tiles on the wall around the recess so that the line of grout appears continuous from the recess onto the adjacent wall tiling.
- Where the tiles only go partly up a wall, or along a wall, end with a full tile.
- Avoid using narrow strips of tiles at corners and top and bottom of a wall.
- Try to take patterned tiles 'around' corners.
- When using occasional patterned tiles in a layout, space the patterned tile evenly.
- Do not tile up to fittings such as basins, cisterns, electrical sockets etc. - remove the fitting and tile behind it and refit the fitting onto the tile surface. This normally is not as difficult as it sounds and gives a far better finish appearance.
While these basic guidelines sound simple, the trouble is that they often conflict - e.g. trying to place tiles evenly about a feature may cause the end tiles to be narrow. Some rooms are almost impossible to tile meeting all the guidelines but there are ways to overcome some problems (see examples below).
In most rooms however, some compromises will need to be made especially in rooms where the fittings are already in place. The biggest problem is normally centering the tiles horizontally on two or more features (such as a window, a basin and a cistern), generally it is better to line up the tiles around the window as the eye is normally drawn towards light and so the window will be the most obvious feature.
A Jury Stick
Some people are happy to work with a tape measure, pencil and paper to achieve the most appropriate tile layout. Other people prefer to work things out on the actual wall, when doing this, a 'jury stick' will help setting out tiles. A 'jury stick' is simply a length of 50x25mm (2x1 inch) timber (1.2 or 1.5 m (4 or 5 ft) long) with the tile positions (with allowance for the grouting spacing) marked along it. If non-square tiles are being used, one side of the 'jury stick' can be marked with the widths while the other side marked with the heights. A 'jury stick' only completely works were all the tiles are the same size, if you plan to use a decorative frieze of narrower tiles, it will help but you will need to remember the frieze row.
To use a 'jury' stick, just hold it horizontally across a feature and move it sideways to get the desired tile spacing, a mark on the stick can be transferred to the wall before moving the 'jury' stick along a wall. Using a 'jury' stick vertically by just turning it to the vertical.
Examples of tiling and comments
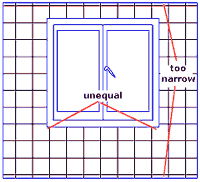 Achieving equal tile width at the ends and equal height at top & bottom of a wall can lead to:
- Off centre tiling around a major feature.
- Tiles too narrow (i.e. very hard to cut) along the edges.
Comments:
- It is generally better to line up around a major feature (i.e. a window) rather than with wall edges.
- Where the tiles are narrow at one or both ends, shifting the pattern by a single tile may overcome the problem but might cause problems around the main feature.
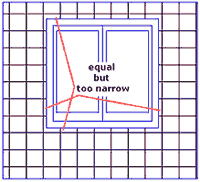 Aligning the pattern to a main feature can lead to:
- Tiles too narrow (i.e. very hard to cut) along the edges. It is especially difficult to cut an L shaped tile where both arms are narrow.
Comments:
- Shifting the pattern by a single tile may overcome the problem.
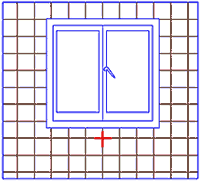 Here we have the tile pattern centred on the main feature (i.e. window) with fairly wide tiles around it.
This will look good and be easier to achieve than trying to cut the narrow sections of tile.
Once you have determined the best tile lines, the position of the horizontal and vertical start lines need to be marked on the wall. In the example above, these are shown by the red cross under the middle of the window. However, the start lines could in fact be on any of the tile joints, the two lines need not even be on the same area - the important thing is to set the marks so that the horizontal and vertical tile arrangements fit the wall/feature.