
Working with Plasterboard - filling the joints
sealing the joints - covering the fixings - final touch
Sealing the joints
Joints between taper edged plasterboard are filled by a combination of joint tape (an open weave tape known as Scrim) and plasterboard filler, this can give a smooth finish which completely hides the joints.
Two tools are required:
- A set of jointing knives - 150, 200mm and 300mm (6, 8 and 12 inch).
and - A soft sponge.
The materials required are:
- Plaster jointing filler - either premixed or in powder form.
and - Scrim (jointing tape) - two types are available, self adhesive and non-self adhesive - the self adhesive type is easier to use.
When using taper edged plasterboard there will be a depression along the joints - if you put the 200mm applicator across a joint this will be noticeable.
Before starting to fill the joints, it is a good idea to lightly a knife across the rows of fixings to see if any are too high and catching it, if necessary hammer or screw any such fixings further in.
 Start by applying the self adhesive scrim (jointing tape) along the joints, don't overlap it as this will cause a built up area. If you are using non-adhesive scrim, you will need to first apply a bed of filler across the joints into which the scrim needs to be pushed and then the next coat of filler applied - it is definitely easier using self adhesive scrim.
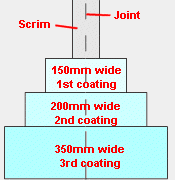
Once the joints have been taped, mix up some jointing filler (or use some ready mixed) and apply this using the 150mm knife over the tape. Use the knife to scrape the filler on, and scrape the surplus off along the joints. The flatter a knife is held to the surface of the board, the more filler will be applied, the closer to perpendicular (rightangles to the board surface) the knife is held, the more filler will be removed. Keep the knife across the tape so that an even layer is build up.
When the first layer has dried, apply a second layer of filler using the 200mm knife to spread the filler over an area about 200mm wide. Using the wider knife will build up the filler within the taper of the plasterboard.
When the second layer has dried, apply another layer of filler using the 300mm knife to spread the filler over an area about 350mm wide. Using the wider knife will build up the filler within the taper of the plasterboard.
When the filler has set, apply another thin coat of filler and then using a damp sponge working in a light, circular motion, feather the edges of the filler onto the front face of the plasterboard - keep washing out the sponge and wringing it to dampness to avoid a build up of filler in it. You may need to repeat this after you have allowed the filler to dry - some people use a fine abrasive paper to get the last marks off, but be carefully not to abrade the front paper of the plasterboard.
Covering the fixings
The fixings can be covered in a similar manner to filling the joints except that taping is not required and only a smaller filler knife is necessary.
Use the filler knife to apply filler around the fixing head and to cover it, use the edge of the filler knife to keep the level of the filler the same as the surrounding plasterboard.
When the filler has set, apply another thin coat of filler and feather the edges of the filler onto the front face of the plasterboard using a damp sponge working in a light, circular motion - keep washing out the sponge and wringing it to dampness to avoid a build up of filler in it. You may need to repeat this after you have allowed the filler to dry - some people use a fine abrasive paper to get the last marks off, but be carefully not to abrade the front paper of the plasterboard.
Final touch
If intending to wallpaper directly onto the plasterboard, it is best to apply a couple of coats of dry wall primer (it is painted on), this makes it easier to stripper the wallpaper later.