Roofing with plain tiles
positioning the battens - laying the tiles - cutting - fixing - verges - ridges - illustration
Safety: Working on a roof involves working at height (even on a bungalow), so always use scaffolding or other stable platform, never use just ladders.
Plain tiles use a double head lap in the same way as slates. They are made of clay or concrete and come in a variety of colours. Concrete tiles are heavier, therefore if you use them as replacements for clay, you must determine that the roof structure can safely support the additional weight. Roofs with plain tiles generally have a higher pitch than those with other coverings.
Positioning the battens:
The supplier of the tiles should recommend the spacing up the roof between the battens (known as the 'gauge'), this usually varies according to the size of the tiles, the pitch of the roof and the degree of exposure. The 'gauge' is in fact the same as the 'margin', which is the length of the tile exposed.
The 'gauge' quoted by the supplier is the minimum required, you need to establish the 'gauge' you require for your roof - see our page "felt and battens" for details of this calculation.
Laying the tiles
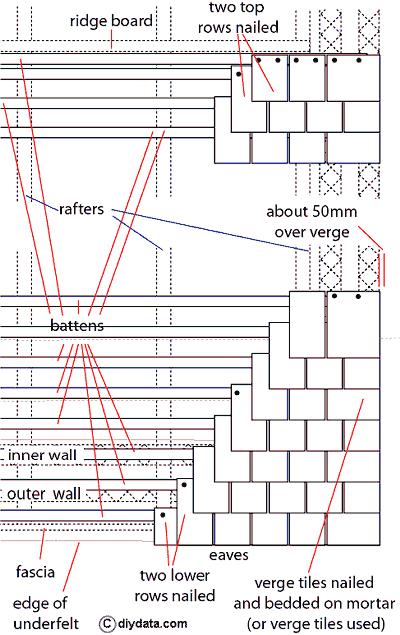
Plain tiles are laid on the battens in a 'brick bond' pattern, i.e. with the joints between them aligned with the centre of the tiles above and below, and with about 3mm between the sides.
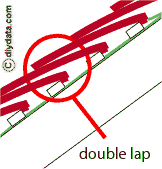 This layout gives a double
lap covering, (i.e. the top part of each tile is covered by two tiles, the centre of the tile of the next row and the lower part
of the tile above that).
This layout gives a double
lap covering, (i.e. the top part of each tile is covered by two tiles, the centre of the tile of the next row and the lower part
of the tile above that).
The lowest row of tiles at the fascia board is made up of shorter tiles to provide the double lap for the first row of full ones, the lower edges of these short tiles and the first row of full tiles should be the same.
The top row of tiles at the ridge is also made up of half tiles to give the next row down a double lap. The top edge of the second row down must be at a level where it will be covered by the ridge tile.
Start tiling by loose laying a row at the eaves in order to establish the spacing between tiles to get a whole number to minimise cutting - to make any adjustment, you can use a 'tile and a half' at one end, or adjust the side gaps between tiles to achieve a suitable fit for a whole number of tiles. However, do remember that if tiling a number of pitches on the same roof, it will look awful if the space between tiles varies between the different slopes.
The technique is basically the same as for slates, the significant difference being that the tiles have nibs on the reverse with which to hang on the battens.
Cutting the tiles
The standard size of a plain tile is 265x165mm with shorter ones for at the eaves and for the top course tiles, plus 'tile and a half' ones for the verges.
Use a mechanical means (such as a disc cutter) for cutting tiles, however it can take a bit of practice to get a neat, clean cut using a disc cutter freehand.
Fixing the tiles
Aluminium nails should be used in preference to galvanised nails as aluminium will not corrode whereas the galvanise coating will tend to. Alternatively copper or stainless steel nails can be used.
Generally it is not necessary (nor desirable) to nail every single tile on roofs - nailing as described here will provide a fully functional roof while allowing individual tiles to be remove later if necessary. Every tile of the 2 rows at the eaves (both the half and full tiles), those up verges and along the 2 rows at the ridge (both the half and full tiles) should be nailed, but otherwise only nail every fifth tile horizontally, and every third tile up the roof.
Do not overdrive the nails, there is not even any need for the nail head to come in contact with the tile - overdriving the nails risk damaging the tile (from the head of the hammer hitting the surface) - the tiles tend to be brittle and can easily be broken.
Verges
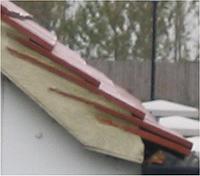 The tiles fitted to the verge (the end of a gable) should alternately be 1½ wide (i.e. 50% wider than the rest), this ensures that the pattern is maintained without having to cut down and use half width tiles at the verges.
The edge of the tiles normally project about 50mm (2 inch) over the edge of the verges and either bedded onto mortar or the space under the lower side is filled using mortar (6:1 sand:cement).
Alternatively, special verge tiles can be used.
If the roof has verges at both ends, measure the run and work out the overhang so that both ends are equal; remember that any row may have a 1½ wide tile at one or both ends, this allows for an amount of adjustment without unnecessary trimming.
Ridges
 Standard angular or half round ridge tiles can be used for both horizontal and hip ridges (Fitting ridge tiles). As an alternative for hip ridges, special angular hip tiles are available which are bedded onto mortar to line up with the row of tiles on both sides - these take far more time to fit and need to be carefully aligned to give a good appearance.
Illustration