Roofing with slates
positioning the battens - laying the slates - cutting - fixing - verges - ridges - illustration
Safety: Working on a roof involves working at height (even on a bungalow), so always use scaffolding or other stable platform, never use just ladders.
Slates are usually more time consuming to fix than tiles because every individual slate has to be aligned and fixed into place with two nails; there are no nibs on the back to locate them on the wooden battens.
Positioning the battens:
The supplier of the slates should recommend the spacing up the roof between the battens (known as the 'gauge'), this usually varies according to the size of the slates, the pitch of the roof and the degree of exposure.
The 'gauge' is in fact the same as the 'margin', which is the length of the slate exposed.
The 'gauge' quoted by the supplier is the minimum required, you need to establish the 'gauge' you require for your roof - see our page "Fitting felt and battens" for details of this calculation.
Laying the slates:
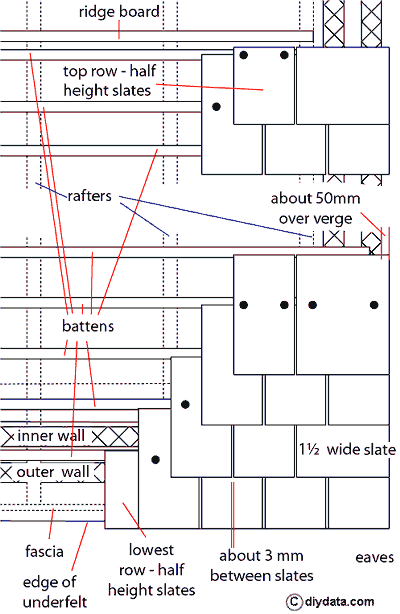
Slates are laid on the battens in a 'brick bond' pattern, i.e. with the joints between them aligned with the centre of the slates above and below, and with about 3mm between the sides.
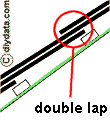 This layout gives a double
lap covering, (i.e. the top part of each slate is covered by two slates, the centre of the slate of the next row and the lower
part of the slate above that). The overlap will depend upon the slope of the roof - the steeper the slope, the smaller the overlap
required.
This layout gives a double
lap covering, (i.e. the top part of each slate is covered by two slates, the centre of the slate of the next row and the lower
part of the slate above that). The overlap will depend upon the slope of the roof - the steeper the slope, the smaller the overlap
required.
The lowest row of slates at the fascia board is made up of shorter slates to provide the double lap for the first row of full ones, the lower edges of these short slates and the first row of full slates should be the same.
The top row of slates at the ridge is also made up of half slates to give the next row down a double lap. The top edge of the second row down must be at a level where it will be covered by the ridge tile.
Cutting the slates:
Slate is by nature a layered material which can tend to flake.
Using a pair of slate cutters is obviously the preferred option, (these support both sides of the cut underneath while the cut is made by a blade coming down between the supports).
Alternatively if the slate is not too thick, hold the slate face down overhanging the edge of a flat surface along the line to be cut. Working towards you, use the edge of a bricklaying trowel to chop along the line and remove the waste.
Fixing the slates:
Aluminium nails should be used in preference to galvanised nails as aluminium will not corrode whereas the galvanise coating will tend to. Alternatively copper or stainless steel nails can be used.
Slates can be either nailed at the centre line or near the top. When slates are nailed at the top, the nails are covered by two slates and so are less exposed, but, being secured at only one end, they are at risk of being lifted by the wind and are more likely to be broken. Nailing slates at the centre line reduces the protection to the nails but reduces the risk of them being lifted by the wind. Generally, it is better to nail them at their centre line using non-corroding nails.
Do not overdrive the nails, just pinching the surface of the slate is enough - overdriving the nails risk damaging the slate (from the head of the hammer hitting the surface) and putting unnecessary stress onto the slate which will make it more likely to break.
Most artificial slates come with the holes already drilled, where necessary nail holes should be drilled at least 30mm in from the edge and 25mm in from the top.
Start aligning and nailing at the lower row of half slates at a verge or other appropriate place - work away from this point along and up the roof. Keep an eye on the position of the holes in relation to the battens, this should prevent you from going off line.
Verges:
The slates fitted to the verge (the end of a gable) should alternately be 1½ wide (i.e. 50% wider than the rest), this ensures that the pattern is maintained without having to cut down and use half width slates at the verges.
Sometimes half width slates are used down the verge underneath the other slates to form a triple lap, this has the effect of tilting up the end slates so that water tends to run onto the roof rather than over the edge.
The edge of the slates normally project about 50mm (2 inch) over the edge of the verges and any space between the lower side and the verge (where barge boards are not used) is filled using mortar (6:1 sand:cement).
If the roof has verges at both ends, measure the run and work out the overhang so that both ends are equal; remember that any row may have a 1½ wide slate at one or both ends, this allows for an amount of adjustment without unnecessary trimming.
Ridges:
The ridge and hips are normally finished with ridge tiles, normally blue or red terracotta angular style. Where ridges meet (such as where a hip ridge meets a main ridge), the ridge tiles should be trimmed so that the ends of the ridge tiles are parallel.
The ridge tiles can be bedded on and jointed with cement mortar (3:1 sand:cement), it often looks better if a coloured pigment is added to the cement so that it is similar to the ridge tile. (Fitting ridge tiles)
Illustration: