
Kitchen design
Planning your kitchen layout
Choosing and positioning kitchen wall/floor units
There are three stages to planning a kitchen:
- Measuring up and noting the position of the existing services, windows and doors.
- Working out the plan to get the appliances, work tops and cupboards where you want them.
- Deciding on any changes to the services (electricity, water, drains) you need.
The following is intended to help you with the actual planning, but they are only suggestions and will not be practical in all situations, you will often have to compromise. The golden rule is - keep it simple - and remember that the kitchen is one of the main selling points for a house.
The principal activity zones in the kitchen are generally recognised as being - food preparation, cooking and serving, and finally washing up. Each activity zone needs to include the worktop(s) and appliances required for that activity, also the zone will require the storage space for the utensils, ingredient etc. required for it.
In addition to the three zones, it is important to arrange the appliances and worktops in the correct order i.e. worktop - appliance - worktop. A work triangle is formed between the three zones (as shown in the diagrams below). For the greatest efficiency the total length of the three sides of the triangle should be between 3600mm and 6600mm, and as far as possible, the work triangle should be uninterrupted by through traffic.
The 4 basic layouts are:
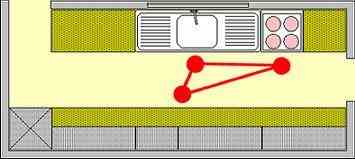
1. Corridor layout. In a long, narrow area with doors at each end you have little choice other than two facing rows of appliances and storage units. You should allow at least 1200mm between two rows for a safe walk-through corridor and to allow comfortable access to front loading appliances. In really narrow rooms, the fittings might need to be restricted to one side of the room.
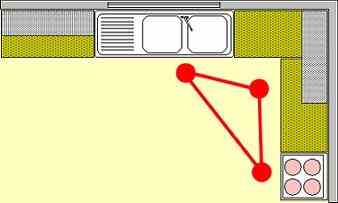
2. L-shaped layout. This is often the best solution where the kitchen can fit into a corner.
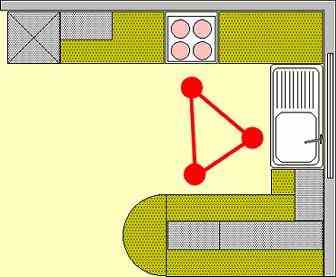
3. U-shaped layout. This layout is convenient as all working areas are within easy reach. It may be the only choice for small rooms although it can also be used with effect where a kitchen area needs to be fitted at one end of a larger room. Try to allow for 1200mm between the parallel sides of the U.
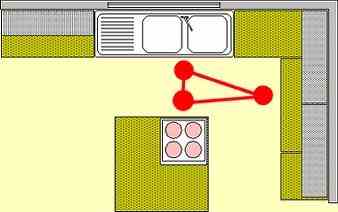
4. Island layout. Often thought of as a luxury, the island layout needs a fairly large room, however in such a room, it does reduce the amount of walking you need to do. Try to allow for 1200mm between the island and any other cupboard/obstruction etc. Although the design shown has the cooking hob on the island, the island could be used for the food preparation area. Remember that services will need to be taken to the island.
Planning your kitchen layout:
Designing a new kitchen layout - remember there are no absolute rules, after all it is your kitchen but. . .. . . . .
-
First of all, list the floor/wall mounted appliances you want to include in your kitchen - see choice of appliances below for the most likely ones you will want to include.
Likely appliances required in a kitchen- Cooker or Hob and Oven
- Extractor hood for cooker/hob
- Washing machine
- Dish washer
- Tumble dryer
- Fridge/freezer
- Room air extractor
- Measure your kitchen at floor level and at about 900mm from the floor - use the smaller measurement for your floor plan.
- Draw a scale plan, using squared paper makes things easier.
- Mark on the plan the services as they currently exist - hot and cold water, drains, electric points, gas points, any existing extractor vents in the walls.
- Cut out paper or card scale footprints for each appliance and sink you want to include. Write the name of each appliance on its respective piece of paper/card.
- Most kitchens need three 'work areas'. Preparation, cooking and washing-up, each area should include all the appliances required and a suitable sized work area around it.
- Roughly position the scale footprints of the appliances in their most logical position with respect to the existing position of the services. Do not worry if you need more services, it just indicated that you will need to add some.
- Look at the free area between the appliances and decide how many base units you need or can fit. Cut out paper/card footprints for these units.
- Position the base unit footprints on your plan.
- You now need to think if there is enough work top surface around each work zone - a lot of the appliances are sized to fit under work surfaces so you should not lose too much. Try to avoid having work surfaces less than 1 metre in length.
- If you cannot fit in all the appliances or base units you have select or you think the room is already too full, ask yourself if you can relocate any appliance in another room - i.e. move the washing machine to the garage.
- Think how you can rearrange the kitchen to make it easier to use, begin to think about relocating the position of the existing services. Remember that in addition to the floor mounted appliances, you will also need electric points for the smaller, moveable appliances which you get out of the cupboard each time you want to use them. All services and window/doors can be repositioned - it is just that additional work is involved; the rough order from easiest to most difficult is - electricity, gas, water supplies, drains (above floor), blocking up doors/windows, drains below floor and moving doors/windows. But remember that you may need professional assistance to move doors/windows and you will need a registered gas fitter to move a gas point.
- Bearing all this in mind, 'play' with the layout to achieve your dream kitchen - then look at any relocation of services required - are you happy with the amount of work involved? You will often that you have to compromise.
- When you are happy with a basic floor arrangement, think about the wall area and where you can fit wall units, these tend to be needed in the food preparation area. Try and keep the wall units inline with the base units below them.
- You should now be in the position to list:
- The number and style of floor units you require.
- The number and style of wall units you require.
- The appliances to be fitted.
- The work you need to do to add or reposition the services.
Choosing and positioning wall/floor units.
See also our page - 'Kitchen Units available in the UK'
- The colour and style are personal matters but:
- If you plan to move house in the next few years, it may be worth being a little conservative - the kitchen is a major selling point and an outlandish style may put off potential buyers.
- Take into account the natural light of the room, you do not want the room to be too dark.
- Remember that the kitchen is a working room, you may want to avoid pure white or other light, plain colours as they can easily discolour unevenly in a kitchen.
- Although there are many different widths of units available, you do not need to use them all. Try to use one door/drawer width along a run with just one 'odd' size installed at one end of the run to fill the space.
- Try to keep the same style for all the units in a run - think carefully before you mix High Line and Drawer Line styles.
- Try to keep the doors on wall units in vertical line with the drawers/doors on base units.
- Where wall units are mounted above floor level cupboards, have the doors opening the same way.
- Do not fit wall units above or immediately to the side of gas hobs/cookers.
Planning your kitchen layout
Choosing and positioning wall/floor kitchen units