
Changing an immersion heater thermostat
From April 2004, new and replacement Immersion Heater Thermostats need to incorporate an overheat safety cut-out so that if the water thermostat fails, the water in the cylinder will not overheat which could cause scalding water to come out of the taps.
If you have an old Thermostat without the overheat safety cut-out which you are thinking of fitting, don't - fit a new Thermostat with an overheat cut-out.
If you have an electric immersion water heater and the heater suddenly stops working or the water is scalding hot, the chances are that the thermostat has failed. Replacement thermostats are inexpensive and easy to fit without needing to drain the water. Immersion heater thermostats are available in various sizes (7, 11, 18 and 27 inches) depending on the manufacturer, model and type of immersion heater - only the correct sized thermostat should be used as a replacement.
Make sure that the immersion heater being fitted incorporated a thermal cut-out (as well as the thermostat) to comply with current regulation. This should not be a concern if fitting a newly purchased heater, but don't fit an old, working heater if it does not have a thermal cut-out.
SAFETY - BEFORE STARTING TO ACCESS THE THERMOSTAT, SWITCH OFF THE ELECTRICITY SUPPLY TO THE IMMERSION HEATER AT THE CONSUMER UNIT - MAKE SURE THAT EVERYONE WITH ACCESS TO THE CONSUMER UNIT IS AWARE YOU HAVE INTENTIONALLY ISOLATED THE IMMERSION HEATER.
ONLY ATTEMPT THIS WORK IF YOU ARE CONFIDENT WHEN WORKING WITH ELECTRICAL CONNECTS - IF IN DOUBT, USE A TRADESMAN.
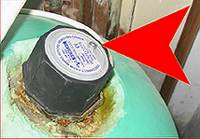 The
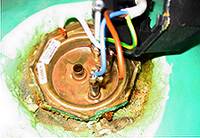
protective cap over the connections to the immersion heater is normally held in place by a nut or screw. Using a spanner or screwdriver, remove the fixing and remove the top cover. With some models of heaters the top cover and body are one piece.
The
protective cap over the connections to the immersion heater is normally held in place by a nut or screw. Using a spanner or screwdriver, remove the fixing and remove the top cover. With some models of heaters the top cover and body are one piece.
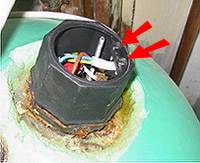 Once the top cover has been removed, release the mains cable clamp (on the model shown here, the clamp is held in place by a strap with two screws).
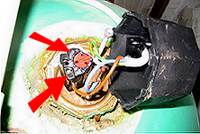 The body of the cover can now be pulled to one side. Before disturbing the thermostat, make a note of the thermostat's setting, this will enable you to set the temperature on the new thermostat to the same value.
The two cables to the thermostat are normally held in place by small screws, release the screws and withdraw the cables.
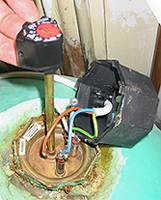 With the wiring disconnected from the thermostat, it can be lifted out.
 This shows the outside of the heater with the thermostat fully removed.
Fitting of the replacement thermostat is just the reverse of the removal. Make sure that the cable terminals on the thermostat are fully tightened.
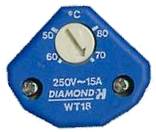 Before replacing the top cover, set the thermostat using a small screwdriver - use the same setting as on the removed thermostat, or if
in doubt, 60° C.
Before replacing the top cover, set the thermostat using a small screwdriver - use the same setting as on the removed thermostat, or if
in doubt, 60° C.