Using compression connectors with copper pipes
Materials:
- wire wool
- jointing compound
- Two - spanners of suitable size OR adjustable spanners OR Stilsons
With all the pieces of pipes cut to length, the ends of each pipe (to a length of about 25mm (1 inch)) need to be cleaned back to bright metal using a piece of steel wool.
Dismantle the connector and clean the inner surfaces and the olive in a similar manner.
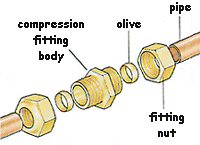
Dismantle all the end nuts from the body of the connector, put the olives to one side and, use your hand, run each end nut onto the threads of the connector - this usually pointless action will detect any faulty thread.
If a nut binds along the thread, check the threads for damage - if you cannot get the nut to run freely, it may be necessary to discard the connector body and/or nut. Remove the end nuts from the body.
Slide each piece of pipe into the connector, make sure they go in as far as the stop in the body - if a pipe binds, it generally indicates:
- a distorted end to the pipe - it is not worth trying to bend the end of the pipe into shape, this very rarely works. Cut another length of pipe.
- a burr on the out side of the pipe - carefully use a fine file to remove the burr.
- an obstruction in the body - if it is a defect in the casting, the connector will need to be discarded.
Slide an end nut over the end of the pipe (obviously with the thread towards the end of the pipe).
 Slide
the olive onto the pipe and push it along a little. If the olive has a different size chamfer on each side, position the longest chamfer towards the end of the pipe.
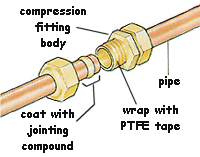
Apply a thin coating of jointing compound around the pipe and over the olive. Start by sliding the olive away from the end of the pipe so that there is compound under the olive when it is in its final position.
[Some people suggest wrapping PTFE tape around the thread of the connectors body - this isn't necessary with an 'olive' joint and there is a risk that the tape will become trapped under the olive and stop it from sitting correctly.]
Place the pipe into the connector body as far as it will go.
 Slide the end nut along the pipe (pushing the olive into the connector) and hand tighten the nut onto the body.
Assemble the remaining pipes into the body of the connector.
Before starting to tighten a nut, double check that each pipe is fully in the connector body.
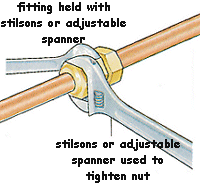
 Using two spanners, hold the body of the connector with one, and tighten the end nut until it starts to push on the olive with the other. Some end nuts are designed for tighten using stilsons - they do not have flats for spanners.
When all the end nuts have been 'pinched', tighten each nut in turn. It is important that the nuts are tighten by the right amount - if a nut is not fully tightened, the joint will leak. If, however, the nut is over tightened, the olive and pipe can become distorted and the connection will again leak. As a guide, the nut should be tightened by one complete revolution after it has been hand-tightening.
As the spanner/stilson is turned, there will be obvious resistance as the olive is pushed onto the pipe - once this resistance is felt, only a small additional tightening (about half a turn) will be required.
Tightening is a skill that will come with practice - play safe by avoiding over tightening. If the joint leaks, the nut can be tightened a little further. However, if the nut is over tightened, the joint will have to be dismantled and remade using a new length of pipe and olive.
