
Cornices and Coving - general
types of coving - types of adhesive
What is the difference between Coving and a Cornice ? Cornice is the generic term, coving has uniform profile, cornice includes corner mouldings with patterned faces.
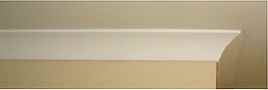
Cornices are simple ways to finish off the look of a room and do not require any special skills to erect, just care and attention.
Their use is especially useful when a new stud wall has been erected or a ceiling has been replaced, fitting cornice will remove the need to undertake detailed finishing of the corner where the wall and ceiling meet.
Types of cornice/coving
| Material | Properties |
|---|---|
| Plaster | heavy, easy to damage
expensive often left unpainted, this needs precautions to avoid messy hand marks when being erected can be painted with water or oil based paint |
| Paper Covered Gypsum or Plaster | medium weight, fairly robust
needs to be painted with water or oil based paint |
| Polyurethane | light, robust
available ready coloured and patterned (such as wood effect) can be painted with water or oil based paint |
| Expanded Polystyrene | light, easy to damage, cheap
has the normal polystyrene bubble surface finish can be painted with water based paint (emulsion) |
| Timber | light, flexible and easy to use
tends to be small finishing strip easy to cut to shape can be varnished or painted - best not to leave untreated as it can discolour unevenly |
 Cornice
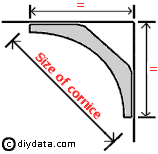
also comes in a variety of sizes, it is often 'equal/equal', i.e. the edges are the same distance from the corner on both the wall and ceiling. The size quoted on most packages is the actual width of the cornice - a 120 mm, equal/equal cornice will come down the wall approx. 82 mm.
Cornice
also comes in a variety of sizes, it is often 'equal/equal', i.e. the edges are the same distance from the corner on both the wall and ceiling. The size quoted on most packages is the actual width of the cornice - a 120 mm, equal/equal cornice will come down the wall approx. 82 mm.
Choose the size of cornice to suit the room, as a general rule, larger rooms look much better with a larger cornice.
Coving is available in various uniform profiles and cornice come with various patterned faces.
Coving, with their uniform profile along the length, are easier to fit and tend to look better in modern properties (unless the general theme of the architecture or decoration is 'old fashion').
Some patterned cornices will add a 'period' feel to a room, but this can easily be spoilt by miss matching of the pattern at corners. The art of putting up patterned cornices involves getting the pattern at all corners to appear as natural points for turning. If possible, all internal corners should turn at the same part of the pattern on the cornice, you cannot just put up a length hoping that the next length will reach the corner at a convenient point in the pattern. Erecting patterned cornices can be undertaken by the diy'er but care and time are necessary to give a professional looking finish.
Types of cornice adhesives
The choice of adhesive depends upon the material of the cornice, the options are:
| Plaster powder adhesive | Needs to be mixed with water before use. Any left unused needs to be disposed of.
Suitable for plaster and paper covered gypsum/plaster. |
| Ready mixed plaster adhesive | Supplied in tubs ready for use. At the end of erecting cornice, just fit the lid to keep the adhesive for future use.
Suitable for plaster and paper covered gypsum/plaster. |
| Polystyrene adhesive | Supplied in tubs ready for use. At the end of erecting cornice, just fit the lid to keep the adhesive for future use.
Suitable for Polystyrene cornice. |
| General gap filling adhesive (NoNails and similar) | Supplied in cartridges for gun application.
Suitable for Polyurethane cornices, those without solvents might be suitable for Polystyrene cornice - but check on a small piece. Ideal for timber cornice as it avoids the need for nails |
The choice between plaster powder and ready mixed plaster adhesives is really a personal one, although using ready mixed should reduce wastage (although it is generally more expensive) and ensure a consistent consistency.