
previously on shopsmithhandson.com
“Dancin’ Duck” puppet
A Proven Seller At Craft Fairs And Flea Markets
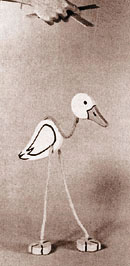 Few will argue that puppets have been favorite toys of children for a long time.
Perhaps that’s because they can be easily made to look and act just as silly as we all often feel.
Kids can entertain themselves for hours on end with these stimulating toys . . . and when they’re demonstrated with enthusiasm at craft fairs and flea markets, few toys will outsell them!
Using a technique called “Pad-Sawing” (cutting out a stack of identical parts at the same time), your Shopsmith Scroll Saw or Bandsaw will make easy work of spitting out Dancin’ Ducks-- that quickly turn int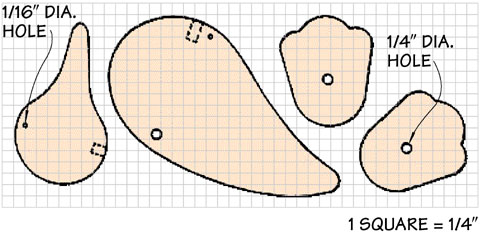 o dollar bills.
Here’s how to do it, using about 10-1/2-inch of 4-1/2-inch wide by 3/8-inch, 1/2-inch or 3/4-inch thick stock for each puppet.
We like the 3/4-inch thick model, but you can make it out of virtually any thickness of lumber you like. Of course, the thinner the puppets, the more you’ll be able to cut out at once . . . although the added weight of the thicker 3/4-inch puppets seems to make them work a little better.
1. Transfer the pattern from the drawing onto sheets of 1/4-inch grid paper, glued to a piece of 1/8-inch hardboard or heavyweight (non-corrugated) cardboard.
2. Cut out the templates using your scrollsaw or bandsaw.
3. Cut out your workpieces, making them 10-1/2-inch by 4-1/2-inch by the thickness of your choice. Align a stack of workpieces and attach them temporarily together using double-stick carpet tape (available at any hardware store or home center). Be sure to keep the height of your glued-up stack within the throat depth limitations of your Scroll Saw or Bandsaw.
4. Trace your patterns onto the top workpiece in your stack.
5. Cut out your four stacks of puppet parts (two feet a body and a head). Take your time. Forcing the saw to cut faster than it wants will adversely affect the quality of the parts you get, creating a lot more sanding work for you.
6. Drill the yarn/control string holes, using a 1/4-inch diameter bit for the clothesline that attaches the head and feet to the body (5 holes) � and a 1/16-inch diameter bit for connecting the two ends of one control stick to the head and the body with monofilament.
7. Smooth all edges, using sandpaper. Don�t try to do this with your router. The pieces are too small to be held safely.
8. Apply a non-toxic finish, such as a salad bowl finish or non-toxic paints.
9. Assemble the puppet, by gluing the ends of ordinary 1/4-inch diameter clothesline into the two feet (pass one end through the lower body hole, first, of course) and the two holes you drilled in the edges of the head and body. DO NOT glue the clothesline to the body, at the point where it passes through.
10. Attach the control lines to small 1/16-inch diameter holes drilled in the ends of two 8-inch long x 3/4-inch wide x 1/4-inch to 3/8-inch thick control handles. Drill a 1/16-inch diameter hole near the far ends of the two handles. Next, cut four pieces of 36-inch long monofilament fishing line. Attach one end of each line to the control handle ends by tying them through or gluing them to the 1/16-inch holes. Attach the opposite ends of the lines on the left/right control handle to the feet by tying them snugly to the clothesline ends where they glue into the feet. Attach the remaining two lines to the small, 1/16-inch diameter holes in the body and the head.
11. Assemble the control handle by connecting the two control handles to each other in the middle with a screw or bolt. Some people claim to achieve better puppet control when the connection between the two handles is left a little loose.
12. Enjoy!