Glazing doors
The glazing of doors is carried out only when the door has been hung. This is to make the door lighter to handle and reduces the risk of the glass being damaged.
The use of putty for the glazing of decorative doors, especially those which are not to be painted, is not recommended. It can be difficult to obtain a putty which matches the colour of the door and many people find it difficult to use putty and obtain a neat finish.
A timber glazing bead used with our gun-applied all purpose silicone sealant is a far better way of achieving a professional finish to your glazing work and Wickes supply a matching glazing bead for their doors.
Like the hardwood doors, this glazing bead is pre-treated with a basecoat. It is available in 2.4m lengths. Some doors are supplied with pre-cut beads. Whilst waiting to hang the door you should cut the glazing beads to size with mitred ends for each glass opening. Once cut, the bead ends should be treated with two coats of Wickes High Performance Woodstain and then all faces treated with a finishing coat of your choice.
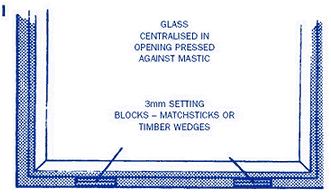
 To fit the glass, apply a bed of the sealant to the rebate upstand. The bed should be about 4mm thick all round. Press the glass into position, centrally in the opening against the sealant, compressing this to about 3mm thick. In order to ensure that the glass does not slide to the bottom of the glass opening it is recommended that small wooden wedges about 3mm thick and 4mm wide are used as setting blocks on which the bottom edge of the glass rests - see Diagram I. Matchsticks can be used or small scraps of timber. Do not use any metal items to act as setting blocks.
The use of these blocks is essential when fitting Wickes clear bevelled edge glass to ensure that the bevelling remains equally aligned around each pane.
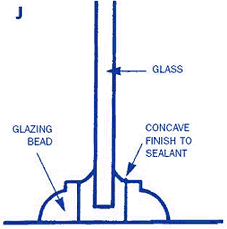
Apply more sealant to the face of the glass around the perimeter, again about 4mm thick, then fit the pre-cut glazing bead. This should be pushed firmly against the sealant to compress it. Pin the bead in place with 25mm panel pins. Do not pin within 50mm of the end of each piece of bead since this could cause it to split. Punch the nail heads below the timber surface. In-fill the resulting hollows with a matching filler or sealant.
 The excess sealant squeezed out on either side of the glass must now be removed to leave a neat slightly concave surface. This is particularly important on the outside to ensure that rainwater runs off easily - see diagram J.
After glazing has been completed the door should be lightly sanded and given a further coat of your chosen topcoat on both sides.
Other related pages:- Choosing doors - Fitting a door frame - Hanging doors
Whilst every care has been taken to ensure that the product design, descriptions, specifications and techniques of construction are accurate at the date of printing. Wickes products will inevitably change from time to time and the customer is advised to check that the design, descriptions, specifications and techniques of constructing any of the products described in this leaflet are still valid at the time of purchase or placing an order. © Wickes Building Supplies Limited 2000. All rights reserved. DIYData.com has Wickes permission to reproduce this article.
All rights reserved. No part of this publication may be produced or transmitted in any form or by any means electronic, mechanical, photocopying, recording or otherwise or stored in any retrieval system of any nature without the written permission of the copyright holder and the publisher.

