
Fitting a picture rail
marking - fixing methods - cutting - fixing
Start by deciding on the height of your picture rail, normally picture rails are positioned between 30cm and 50cm (12 and 20 inches) below the ceiling - generally, the higher the room, the greater the distance from the ceiling.
Unless there is more than about 15cm (6 inches) between the top of the door frame and the picture rail, dropping the picture rail to line up with the top of the frame is a good idea.
Marking the walls
Marks the walls in each corner with the required distance down from the ceiling for the picture rail - mark the line for the picture rail around the room by:
- Working from one corner using a long straight edge and a spirit level to mark the line (when you reach the far corner, you will find out how accurate your have been or how level the ceilings are).
OR - Fix a chalked line between corners and snap the chalked line to the wall.
OR - Use a laser level positioned in the centre of the room - this will be the most accurate and easiest method - laser leveling kits can be hired from most good tool hire centres.
If the picture rail is to go up a stairway, measure the required height for the rail at the point that the skirting board changes direction for the stairway, and use a chalked line between these marks to set the line for the rail.
Fixing methods for picture rails
There are a number of options for fixing picture rails to walls, the three shown below are suitable for screw fixing to masonry walls, other options will need to be considered for other wall construction method:

Simply, drill, wall plug and screw - covering screw head with plaster or filler

Drill, counterbore, wall plug, screw and use dowel plug to cover the screw head.
Gives a better finish if the dado rails are varnished.

Drill, nailable plug fixing - covering nail head with plaster or filler
For plasterboard stud walling, use a screw fixing with plugs for hollow walls.
Fix the picture rail at about 30cm (1ft) from each corner and then at no more than 1m (3 ft) intervals, drill the rail AFTER the ends have been mitred - then use the drilled rail as a template for drilling the wall.
Cutting the picture rail moulding
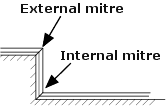 Start with the picture rail for the longest length of plain wall and mitre the ends of the first rail using a saw and mitre box. Note the possible need for two types of mitre (see right) to suit any alcoves - the wall length is always the measurement on the back of the picture rail.
If a wall is longer than a single piece of picture rail, mitre the ends to overlap where they join along the wall run.
Fixing the picture rail
Position the cut and drilled rail against the wall with the top edge lined up with wall mark. Mark the positions for the screw holes onto the wall.
Drill the fixing holes in the wall as marked. Use appropriate wall plugs.
Fix the first piece of picture rail in place and work around the room using the same procedure.
Once all the picture rail has been fixed, cover the screw heads with filler and allow to dry. Sand off the filler and paint or varnish as required.