
previously on shopsmithhandson.com
The Sunshade Sandbox
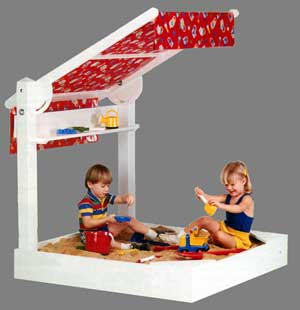 A great back yard spot for the kids to pretend they're spending the day at the beach!
Sit back in your favorite easy chair.
Close your eyes and recall those misty memories of childhood days gone by.
Remember feeling the warm, soft sand beneath the soles of your feet...the coolness on your fingertips as you'd dig deeper and deeper...the lazy hours whiled away building sand castles under a hot, cloudless Summer sky?
It made no difference whether your experiences in the sand were on a beach or in a cozy box in your own back yard, you were driven to dig and explore, immersed in the imaginative fun it provided.
Then, as now, kids were kids and with your help, your kids can enjoy many happy hours in this special, free-standing Sunshade Sandbox, just as you did when you were young and fancy-free. Oh, to be a kid again!
For the letter references in the instructions below refer to the related diagrams.
Getting it together
To get started, you'll need four eight-foot 1 x 8's for the sides (A), shelf back (E) and canopy frame (G & H). You'll need an eight-foot 1 x 12 for the seats (C) and the cleat strips (L) - and an eight-foot 4 x 4 for the two posts (B). You'll also need a half-sheet of 1/2" exterior grade plywood for the bottom (J) plus a bit more of the same for the Pivot Supports (K). Add a half-sheet of 1/4" exterior plywood for the top/cover (K), plus the hardware listed in the bill of materials and you're ready to go to work.
Sawing the parts
Cut your stock to size, following the bill of materials. NOTE: Make the seats by first cutting an 11-1/4" square piece of stock from one end of your eight-foot 1" x 12"...then cutting this piece in half diagonally at a 45-degree angle. Later, you'll rip much of what's left of this stock into 3/4" x 3/4" strips for use as cleats.
With your Bandsaw Miter Gauge set at 60-degrees, cut the decorative top angles on the post tops. Caution: Do not attempt to make these cuts on your table saw.
Use your Bandsaw again (or a hand-held saber saw) to cut the notches in the bottom (J), top (K) and shelf ends (D) for the posts and 3/4" x 3/4" screw blocks in the two front corners of the bottom (J).
Make a 45-degree diagonal cut across the two front corners of the top (K) so it will sit down flush with the two seat tops and rest on the upper edges of the sides (A) when in use.
Use your Bandsaw to cut the two semi-circular pivot supports (F) from 1/2" plywood. Drill a 3/8" hole at the pivot point and a 7/16" hole at each end of the pivot slots in each of the supports (F). Use a Scroll Saw, hand-held saber saw or router to cut the pivot slots.
Drilling
Drill 1/4" pilot holes in the posts (B), as well as the left, right and rear sides (A) for the corner lag screws. IMPORTANT: Be sure to stagger these hole positions so the lag screws you insert through the back sides of the posts don't intersect with those you insert through the post sides.
Drill a series of 1" diameter holes in the bottom (J) to allow for drainage.
Making the cleats
Using what's left of your 1" x 12" above, you'll need to rip off a number of 3/4" x 3/4" strips for use in making the support cleats and two vertical screw blocks in the front corners of the sandbox. Here's a list of what you'll need:
For the bottom:
· (2) 43-3/4" long pieces that attach flush to the bottom of the left and right side pieces (A)
· (2) 41" long pieces that attach flush to the bottom of the front and back side pieces (A)
· (2) 19" long pieces that attach diagonally to the underside of the bottom (J)
For the cover
(all attach to the underside of the cover (K):
· (1) 41" long piece for the back edge
· (1) 25-1/2" long piece for the front edge
· (2) 33-1/4" long pieces for the left and right sides
· (2) 9-1/2" long pieces for the front seat (C) corners
· (2) 16" long pieces, diagonally from the seat centers to the center of the cover
· (2) 19" long pieces, diagonally from the back posts to the center of the cover
Miscellaneous:
· (1) 37" long canopy center support
· (2) 7-1/4" long shelf supports
· (2) 7-1/4" long vertical screw blocks for the front corners of the box
Assembly
All parts should be glued using two-part resorcinol or similar waterproof glue, then nailed or screwed together with drywall screws.
Start by gluing and screwing the box sides (A) together with (8) #6 x 1" drywall screws. Use the 7-1/4" long vertical screw blocks in the front corners for reinforcement.
Use glue and (8) lag screws with 5/16" I.D. flat washers to attach the two posts to the back corners of the box. The bottom of the posts should be flush with the bottom of the sides (A).
Use glue and 4-penny finishing nails to attach the cleats to the undersides of the bottom (J) and cover (K)...and at the bottoms of the sides (A), as described above.
Drop the assembled bottom (J) into the box and attach it to the side cleat strips with (20) #6 x 1" drywall screws (DO NOT USE GLUE). Assemble the shelf (D) and shelf back (E) with glue and (5) #6 x 1-1/4" drywall screws up through the shelf bottom. Use glue and (2) #6 x 1" drywall screws to attach a 7-1/4" long shelf support cleat to the underside of each shelf end...then attach the shelf to the inside of the two posts using glue and (2) #6 x 1-1/2" drywall screws through each end cleat and into the posts.
Assemble the pivot supports (F) to the canopy sides (G) using glue and (2) #6 x 1" drywall screws for each side. Next, attach the canopy ends (H) to the canopy sides (G) using glue and (2) #6 x 1-1/2" drywall screws on each end.
Using (2) 3/8" x 6" roundhead stove bolts, (4) 3/8" I.D. fender washers and (4) 3/8"-16 hex nuts, attach the top of the pivot supports (F) to the side posts. Tighten one hex nut on each side, leaving them loose enough for the canopy to pivot smoothly...then tighten the additional hex nuts against them as “jam-nuts”.
Insert (2) 3/8" x 5" carriage bolts, (2) 1/2" I.D. fender washers (on the head ends of the bolts), (2) 3/8" I.D. fender washers and (2) 3/8" - 16 wing nuts through the trunnion arch of the pivot supports and into the side posts.
Glue and nail the seats to the front corners, then finish the sandbox with an exterior natural finish or weatherproof paint of your choice.
Sewing the canopy
Fold and pin a 3" hem on each end of the canvas (N). Use heavy thread and a heavy duty needle to sew an open ended hem on each end of your material. These hems will each hold a dowel rod. Slide the dowel rods (M) through the hems and hold them in position with a staple or small, large-headed carpet tack at each end. The canopy can then be rolled up for storage during bad weather.