
Fitting shelves in an alcove
Fitting shelves in an alcove is often convenient as it can be an awkward place to use for other purposes.
An advantage of shelves placed here over other positions is that the two ends of each shelf can be firmly supported by battens fixed to the walls at both sides of the alcove as well as a batten along the back rather than depending on brackets screwed to the wall.
Timber battens (50x18mm (2x¾ inch) planed timber) will provide all the support needed for most situations - see below for an alternative method to support the shelving using metal angle, this can give a 'cleaner' appearance.
Using wooden batten supports.
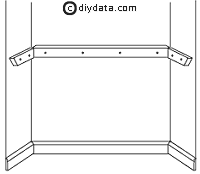 Start by fitting the batten to the rear wall.
- Measure the width of the alcove and cut the timber to about 12mm (½ inch) below this measurement.
- Drill and, if necessary, countersink holes for the fixing screws equally spaced along the centreline of the batten.
(Masonry walls) For light loading shelves, space the holes no greater than about 450mm (18 inches) apart (with the end holes about 225mm (9 inches) in from each end) - for heavy loads, space the holes no greater than about 300mm (12 inches) apart (end holes about 150mm (6 inches) in from the ends).
(Timber frame walls) Space the holes to suit the vertical members. - Offer up the batten against the rear of the alcove at the required height and set it level using a spirit level. Mark through the fixing holes on to the wall.
- Drill masonry walls to take suitable wall plugs and fix the batten in place using screws which enter the wall at least 38mm (1½ inch). For timber frame walls, drill though the plaster board then screw straight into the frame work.
Tip: If the battens are going to be painted, rub them down and apply primer/ undercoat before fixing them to the walls - then fill in the screw head recesses and apply top coat.
- Fitting the side battens.
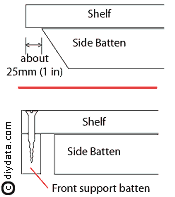
- Cut the side battens to about 38mm (1½ inch) less than the width of the shelving. Cut the rear square across the timber, cut the front at a slight angle so that the lower side will be slightly back - this will improve the look. (NOTE: see figures right, the upper figure is as described; if a front support batten is going to be fitted to the shelf, cut the side batten shorter to clear the support batten, and there is no need to angle the front end).
- Drill and, if necessary, countersink holes for the fixing screws equally spaced along the centreline of the batten - remember that the side battens are 'handed' if the front is cut at an angle. Normally just 2 holes will suffice unless the alcove is exceptionally deep. For timber frame walls you will have to match the spacing of the vertical members.
- Offer up each side batten against the side of the alcove in turn and use a spirit level resting on the back batten to obtain the line. Mark through the fixing holes on to the wall.
- Drill masonry walls to take suitable wall plugs and fix the batten in place using screws which enter the wall at least 38mm (1½ inch). For timber frame walls, drill though the plaster board then screw straight into the frame work.
- Fitting the shelf.
- Consider that the sides of the alcove may not be parallel, so measure both the front and back between the sides to get the length for the shelf. If the sides are badly out of true, you may need to use an adjustable square to determine the angle required for each end of the shelving plank.
- Mark out the shelving plank and cut to size.
- Usually there is no great need to secure the shelving to the battens - the weight of it will hold it in place.
However, for a 'light' hold, use a couple of panel pins through each end of the shelf just to enter the side battens - drill the ends of the shelf and just tap the panel pins in.
For a stronger hold, drill each end of the shelf to accept a screw which can be screwed downwards into the side battens. 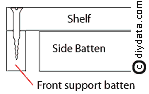 If fitting a front support batten to the shelf, measure across the front of the shelf between the side walls and cut the support batten to size - providing that the shelf is fairly 'heavy duty', and the load not very heavy, 50x18mm (2x¾ inch) planed timber glued and screwed edge to the shelf will suffice.
NOTE: fixing the batten from above the shelf (as shown), is OK when the shelf is above eye level but the screw heads do not look very nice when viewed from above unless the shelf is painted to hide them.
Alternative support for alcove shelving.
 An alternative to using wooden battens to support alcove shelving is to use metal (aluminium) angle to form a ledge around the alcove to support the shelving as shown right.
The basic method of fitting the support is the same as above for the wooden battens i.e.
- Measure, cut, drill and fix the back support but use dome head screws instead of countersunk. If the shelving is going to be secured to the supports with screws from underneath, drill the required holes in the metal angle before fixing them to the wall.
- Measure, cut, drill and fix the side supports, again using dome head screws. Cut the side supports to leave room for a front support batten if one is going to be fitted.
- Measure and cut the shelving to fit between the sides of the alcove.
- Mark on the edge of the shelving the positions of the wall screws and then cut recesses in the edges of the shelf to clear the screws - only recess immediately next to the screw heads, not along the full length.
- Fit the front support batten if needed.