
previously on shopsmith Inc
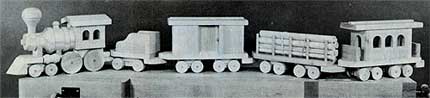
The Heirloom Toy Train
A five-car Train that's loads of fun for you to build -- and durable enough to be around for your grandchildren and great-grandchildren to enjoy
We've been told that the first toy train appeared in the 1820's - just a few short years after the first real train carried its first passengers and hauled its first load of freight.
As the railroads grew and the design of locomotives evolved and diversified, so did the toy train.
But even today, the favorite of kids everywhere remains the classic 4-4-0 from the Golden Age of Steam. So, with a puff of steam and a hearty tug of the whistle, we're off!
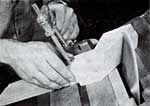
Note: these instructions are written around the use of a tilt saw table; if not available, other options should be considered.
For the letter references in the instructions below refer to the related diagrams.
The Locomotive
1. Start by cutting all the pieces to the proper size and shape, using the gridded patterns we've provided. Drill 7/16" dia. axle holes in the Wheel Mounts (D&E) and a 7/16" dia. hole in the Engine Coupler (F). Refer to the patterns for the correct positions of these holes. Drill 3/8" dia. holes in the centers of the Wheels (L&M). Using your Lathe, turn the Pistons (N), Boiler (O), Smokestack (P) and Pressure Dome (Q).
 Cut the cowcatcher when the upper, Mid and Lower Platform (A, B, & C) have been glued up. The table is tilted at 30°; the miter gauge at 60°.
2. Glue up the Platform Sections (A,B&C), referring to the pattern for proper positioning. Cut the CowCatcher using a compound cut on your Table Saw - Set your MARK V Table tilt to 30-degrees and your Miter Gauge to 60-degrees.
3. Tilt your MARK V's Table to 15-degrees and cut the top edges of the Upper Cab Sides (I) to accept the tilted Roof. Glue the Upper Cab Sides (I) to the Lower Cab Sides (J), referring to the pattern and exploded view for proper positioning. Be sure the lower Cab Sides protrude 3/4" below the Upper Cab Sides when assembled.
Glue the Cab Sides to the Firewall (H). With your MARK V's Table still tilted to 15-degrees, cut the mating inside edges of the Cab Roof (K) to create the proper Roof pitch. Glue the two halves of the Roof together, then glue the entire Roof assembly to the top of the assembled Cab. For added strength, these (and all) component joints can be reinforced with dowels or screws.
4. Glue the turned Boiler (O) to the Boiler Mounts (G). Reinforce these glue joints with countersunk flathead screws, driven up through the bottoms of the Mounts and into the Boiler.
Drill shallow, 1" dia. holes in the Top of the Boiler to accept the Smokestack (P) and Pressure Dome (Q). Refer to the pattern for proper positioning.
5. Temporarily, assemble the Wheels to their Mounts. Position the wheel assemblies under the Platform and the Boiler and Cab assemblies on top of the Platform. The back of the Drive Wheels (M) should be flush with the back of the Cab and the Truck Wheels (L) must not rub against the CowCatcher. Once you're comfortable that you have all of the assemblies aligned properly, mark for position and disassemble them.
6. Glue on the Boiler and Cab assemblies and reinforce them with dowels or screws, as you prefer.
7. Glue the Truck Wheel Mounts (D), Drive Wheel Mounts (E) and Engine Coupler (F) to the Platform. Take care to be sure the axle holes line up properly. Refer to the pattern for the position of the Coupler. Reinforce with dowels or screws, as you prefer.
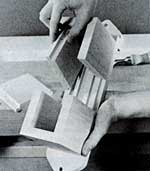
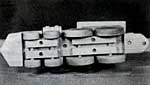 The underside of the engine, showing the reinforcing screws before they are covered with dowels.
8. Insert the Axles (R) through their Wheel Mounts (D&E) and glue the Wheels onto the ends, being careful not to allow excess glue or squeeze-out to touch the Mounts. 
9. Using a Sander or rasp, create a 3/4" wide flat spot on the Pistons (N) and glue them into position on the edge of the Platform (A), above the Rear Truck Wheels (L). Reinforce with dowels or screws, as you prefer.
10. Glue the Smokestack (P) and Pressure Dome (Q) into the holes in the top of he Boiler (O).
The Coal Car
1. Cut all pieces to their sizes and shapes, following the patterns provided. Drill 7/16" dia. axle holes in the Drive Wheel Mounts (E), a 7/16" dia. hole in the Car Coupler (U) and 3/8" dia. holes in the Coal Car Platform (V) and the centers of the Truck Wheels (L). Refer to the pattern for proper hole positioning.
2. Glue the Coal Car Sides (W) to the Coal Car Back (X), then glue the Coal Car Assembly to the Coal Car Platform (V) and reinforce with dowels or screws, as you prefer.
3. Glue the Drive Wheel Mounts (E) to the Coal Car Truck Mount (T), taking care that the axle holes line up properly. Glue the Car Coupler (U) to the Coal Car Assembly, referring to the pattern for position. Reinforce with dowels or screws, as you prefer.
4. Temporarily assemble the Wheels to their Mounts. Place the Coal Car Assembly on the Truck Assembly and mark for position. Be sure the Wheels don't rub on the Car Coupler (U). Disassemble.
5. Glue the Truck Assembly to the Coal Car Assembly. Reinforce with dowels or screws, as you prefer. Insert Axles (R) through the Mounts and glue the Truck Wheels (L) onto the ends, being careful not to allow excess glue or squeeze-out to touch the Mounts. Glue Coupler Pin (S) into the hole on the Coal Car Platform (V). The Pin should extend 3/4" below the Platform.
The Basic Car
The basic car and a bottom view of a basic truck assembly
Many different Cars can be made to follow the Locomotive and Coal Car, all mounted on a Basic Car Assembly.
1. Cut all pieces to proper size and shape, following the patterns provided. Drill 7/16" dia. axle holes in Truck Wheel Mounts (D), a 7/16" dia. hole in Car Coupler (U) and 3/8" dia. holes in the Car Platform (Z) and the centers of each Truck Wheel (L). Refer to the pattern for proper positions.
2. Glue Special Car Assembly (Log Car, Box Car, etc.) to Car Platform (Z) before assembling the Basic Car.
3. Glue Truck Wheel Mounts (D) to Truck Mounts (Y), taking care that Axle holes line up properly. Glue Car Coupler (U) to Car Platform (Z). Refer to pattern for proper position. Reinforce with dowels or screws, as you prefer.
4. Temporarily assemble Wheels to Mounts. Place Car Assembly on top of Truck Assemblies and mark for position., Truck Mounts (Y) should be approximately 2-1/4" apart and Wheels should not rub on Coupler. Disassemble.
5. Glue Truck Assemblies in position and reinforce with dowels or screws, as you prefer. Insert Axles (R) through the Mounts and glue Wheels (L) onto the Axle ends, being careful not to allow excess glue or squeeze-out to touch the Mounts. Glue Coupler Pin (S) in hole in Car Platform (Z). Pin should extend 3/4" below Platform.
Design and build as many cars for the Train as your child can push along. Here are three suggestions:
The Flat Car
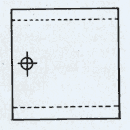
1. Cut the basic car pieces and 10 extra axles. Drill ten 3/8" dia. holes in the Car Platform (Z) for the vertical Axles. Holes should be spaced 2-3/16" apart in two rows, 3" apart, 3/8" in from either edge of the Platform.
2. Glue Axles (R) into these holes, protruding above the Platform as shown.
3. Assemble the Basic Car.
The Box Car
Cut out the Basic Car Pieces plus the pieces listed for the Box Car.
1. Cut out the Basic Car pieces, pus the pieces listed for the Box Car.
2. Glue the Box Car Sides (DD) to the Car Front and Back (CC). Reinforce with dowels or screws, as you prefer. Glue Box Car Side/Front/Back Assemblies to Platform (Z), leaving a 3" space between Assemblies for the Doors. Reinforce with dowels or screws, as you prefer.
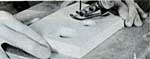
3. Cut a 5/16" rabbet, 5/16" deep in the tops and bottoms of the Car Doors (EE). Drill a 3/8" dia. hole, midway up the Door sides and 3/8" in from one side for the Door Pulls, as shown.
 |
 |
| The rabbets in the Box Car Doors (EE) ride on the inside Door Slides (FF). |
Glue the Door Pulls (HH) into these holes with the ends protruding from the sides opposite the rabbets.
4. Glue two inside Door Slides (FF) to the Car Platform (Z), 1/2" in from the Box Car Sides (DD). Position the Doors in place with the rabbets riding on the Slides. Repeat this process for the opposite side of the Car Platform.
Repeat the steps above for affixing the Door Slides (FF) to the underside of the Box Car Top (AA). Set the Top (AA) into position with the Doors riding in the Slides and check to be sure the Doors slide properly.
5. Spread a liberal amount of glue on the top of the Box Car Sides, Front, Back and Upper Inside Door Slides and glue the Car Top (AA) in place. Reinforce with dowels or screws, as you prefer.
Glue the Top Rail (BB) down the middle of the Car Top (AA). Glue the Outside Door Slides (GG) to the Car Platform (Z), the inside edge flush with the inside edge of the Box Car Sides (DD).
6. Assemble the Basic Car.
The Pullman
1. Cut out the Basic Car pieces and the pieces listed for the Pullman Car, using the patterns provided.
 The windows in the Upper Cab Sides (I) and the Pullman Sides (II) can be cut with a scroll saw or coping saw, using an internal piercing cut.
2. Glue the Car Front and Back (CC) to the Pullman Sides (II). Glue the Car Top (AA) to the Pullman Assembly. The Top should overhang the Car Front and Back by 1-7/8". Reinforce with dowels or screws, as you prefer. Glue Top Rail (BB) down the middle of the Car Top (AA).
3. Temporarily position the Pullman Assembly and Observation Railings (JJ) on the Car Platform. The Railings should be 1-1/8" away from the Car Front and Back. Mark for position, then glue in place and reinforce with dowels or screws, as you prefer.
4. Assemble the Basic Car.
Finishing:
We recommend that you finish your Toy Train with a non-toxic finish. If you build a long Train - a Locomotive and several cars - you may find it timesaving to cut the pieces (wheels, mounts, platforms, etc.) all at once. Look over the Bills of Materials, add up the number and types of pieces you'll need, then set up your MARK V for “mass production”.
One more tip...When you finish assembling your Train, get down on the floor, hook the cars together and play with it to your heart's content. Once you give this to a child, you'll never have another opportunity to do so...unless you build another for yourself !