
Wallpapering - hanging the paper
starting/finishing points - setting out - turning corners - hanging the wallpaper
Decide on the starting and finishing points
The usual starting point for vertical hanging is on a wall adjacent to a window and the wallpapering should progress from this starting point in both directions around the room to finish somewhere opposite the window - so any overlap between adjoining lengths will not cast a shadow. Patterns are unlikely to fit horizontally around a room so the finish point should be in some corner where any mismatch will not be noticed.
When using paper with a large pattern, it is a good idea to centre the pattern on the chimney-breast and any other main feature of the room. This may mean that you have two or more mismatched seams to hide but it is worth the effort.
Set up the starting lines
A vertical starting line needs to be established at the start of every wall where you turn a corner.
On a plain wall:
Very few corners are exactly true from top to bottom, so a true vertical needs to be established to align the edge of the first length on each wall.
First establish how wide a length you will require at the end of the first wall if you start with a full width; either measure the wall and take off full roll widths, or walk along the wall with a roll, and note the width left at the end. If the final width is less than about 150mm (6 inches), it is better to start the wall with a half width length (i.e. a full length cut lengthways) rather than a full width.
At the top of the starting corner, measure out a distance of the width of the paper (either full or reduced width as you decide) and either:
- less 12mm(½ in) - if the paper is to be turned onto the adjacent wall.
or - plus 8mm - if the paper on the adjacent wall is to be turned onto this wall.
From this mark, suspend a plumb bob and use a pencil to mark the wall behind the line at several points, then use a straight edge to join the marks together with a pencil.
Although shown here working from an internal corner, the same applies with external corners.
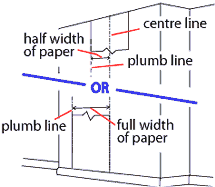 On a chimney-breast (or other prominent feature)
Calculate the number of widths of wallpaper which will fit across the chimney-breast - if the next highest number is odd, use method 1 below, if the next highest number is even, use method 2 below. (This ensures that the wallpaper widths are symmetrical with the lengths at each side not too narrow).
Method 1 - Measure half the width of the wallpaper from the centre line of the chimney-breast towards the window (or left, if window behind) and mark this point as high as possible. From this mark, suspend a plumb bob and use a pencil to mark the wall behind the line at several points, then use a straight edge to join the marks together with a pencil.
Method 2 - Measure a full width of the wallpaper from the centre line of the chimney-breast towards the window (or left, if window behind) and mark this point as high as possible. From this mark, suspend a plumb bob and use a pencil to mark the wall behind the line at several points, then use a straight edge to join the marks together with a pencil.
Thinking about turning corners
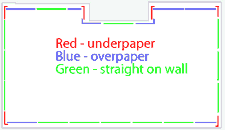 When hanging wallpaper around corners it is necessary to overlap the paper from one wall onto the paper on the adjacent wall, this does produce a 'double layer' which can be quite noticeable. However, by paying attention to how the overlaps are arranged, it is possible to reduce their visual impact. The drawing to the right shows an ideal arrangement of overlapping to minimise their visual impact, this is ideal where there is a small, or no pattern, it may be hard, and sometimes wasteful, to achieve when patterned wallpapers are being hung.
The main points are at the corners of the chimney breast (where the front side lengths are folded back onto the sides) and at the back of the alcoves (where the paper on the side walls go around onto the back of the alcove before being covered). To follow this pattern, it is necessary to plan the paperhanging carefully; it is not just a case of starting near the window and progressing around the room.
Hanging the wallpaper
NOTE: the directions given below are for working left to right, the hand positions referred to will reverse when working right to left.
Make sure that you have all the equipment you need to hand, and a suitable pair of steps.
Hanging the first length.
Once the first length of wallpaper has been pasted and allowed to soak, carry it to the start line and unfold the top fold and the top half of the length.
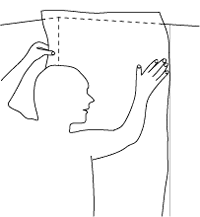 Holding the wallpaper near the top with one hand on each side, line up the right-hand edge with the plumb line mark on the wall and overlap the top of the length above the area to be papered.
Keeping the left-hand edge away from the wall, gently place the right-hand edge against the wall, then working with your right hand, smooth the right hand side of the paper onto the wall. Make any small adjustment necessary to keep the right-hand edge in line with the vertical mark by gently sliding the paper sideways - to make any large adjustments, lift the lower end of the paper away from the wall to release it and then reposition it.
Once the top half of the wallpaper is lined up, move your left hand towards the wall at the same time using a wallpaper hanging brush to smooth the paper onto the wall first down the centre and then alternately out sideways - you may find that the right edge of the paper moves off of the vertical mark, just sweep the hanging brush left or right to reposition it.
At the corner, use the hanging brush to get the paper to turn the corner.
Unfold the lower half of the length and the bottom fold and drop the right-hand edge against the wall, line up the right-hand edge with the vertical mark in the same way as for the top half, then smooth on the rest of the paper using the hanging brush first down the centre and then alternately out sideways.
If any air bubbles are noticed, lift the nearest edge of the paper away from the wall and re-smooth with the hanging brush working out sideways.
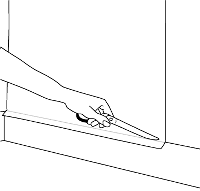 At the bottom of the length, press the paper into the corner at the top of the skirting board, then draw the end of your closed scissors backwards along the line to crease the paper. Pull the paper away from the wall and use the scissors to cut off the surplus allowing about 3mm (1/8 inch) which can be turned on to the skirting board to conceal any cracks there may be. Smooth the end on to the shirting board using the hanging brush.
Repeat this at the top of the length.
Use a damp clean sponge to clean any paste off of the skirting board and ceiling before it dries.
TIPS:
- Don't try to trim the pasted paper with a craft knife, it will invariably tear the paper instead of cutting it.
- Try to avoid getting any paste onto the front of the paper - depending upon the type of paper, it may discolour or damage it - don't worry if it is a true paper which you intend to paint. If you do get paste onto the front, remove it immediately with a clean, damp sponge while the paste is still wet.
- Keep all your tools clean, keep the bristles of the hanging brush free of paste and wipe off any paste that gets on the scissors. It is best to be methodical when hanging paper and to keep your tools clean all the time.
Hanging the other lengths
Hanging the remaining lengths is similar to hanging the first except that you need to line up the LEFT hand edge with the previous length, so when you offer up the new lengths, keep your right hand away from the wall and use you left hand to line up both the edge and any pattern.
Take care to match the pattern between lengths. Sometimes the paper will stretch differently between lengths, where this happens, match the pattern at normal eye level - any mismatch above or below eye level will not be so noticeable.
Continue hanging the full width lengths of wallpaper in this manner to the end of the wall.
Hanging the last length on a wall
At the end of the wall, you will probably need to cut down a width of wallpaper to fill the last piece of wall and, if necessary, turn the corner. To establish the width of paper required, measure between the previous hung length and the corner (in some properties it is worth measuring at the top, in the middle and near the floor just to check how true the corner is) and then allow either:
- An additional 12mm (½ in) if the paper is to turn the corner onto the next wall.
Or - A reduction of 8mm if the paper on the next wall is to be (or has been) turned onto this wall.
Cut the width a length of wallpaper down as described on this page, before cutting, double check that you are cutting the edge which will go into the corner, not the edge which will butt up to the previously hung length.
Hang this final length in the same way as the previous lengths and use the hanging brush to smooth the wallpaper into, and around the corner.
Remaining walls
Paper the remaining walls using the same procedure as described above. The corners are unlikely to be perfectly square so it is always necessary to mark a vertical line on the new wall as described above.
You will also need to match any pattern at the corners. The piece turning the corner are usually trimmed, so, as you need an overlap, you cannot just use the offcut from that last piece. Take a new new length of wallpaper (or check any full length off cuts) and establish a pattern match; you will probably need to cut down the width as described on this page, before cutting a length double check that you are cutting the edge which will go into the corner, not the edge which will butt up to the new vertical mark.
Once you have your first length for the new wall, hang it and the remaining lengths as described above for the first wall.
More tips:
- Patterned wallpaper is unlikely to match in the final corner, so plan for the join to be in the least noticeable part of the room - i.e. generally a corner. Alternatively, have one wall with a different wallpaper pattern (or no pattern) then there is no worry about matching patterns.
- Vinyl wall covering - normal wallpaper paste will not stick vinyl to vinyl so use a latex adhesive when overlapping edges or they will lift.
See these other pages for paperhanging around obstacles: