
Repairing small damaged areas in plaster
Internal plaster walls and ceilings often develop small cracks over time, these are not normally serious although it is worth knowing what to look for with cracks in walls to indicate when professional advice is worthwhile, if only for peace of mind. As far as walls are concerned, the points to watch for are:
- Small (1 or 2mm wide), random cracks general indicate no major structural problems.
- Cracks which run in horizontal or vertical straight lines, or which run in a stepped pattern may indicate a professional assessment should be undertaken.
- Cracks where the two sides form a step again may indicate the need for a professional assessment.
- Any long cracks over about 3 mm wide, and also where something thin can be projected deep into the crack.
Most small cracks can be easily covered by wallpaper. Where walls are going to be painted with ordinary paints, the cracks need to be filled and this page deals with filling small cracks in plaster walls.
Repairing cracks in plastered walls
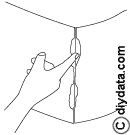
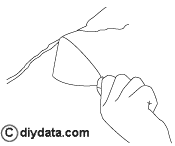 The first thing to do is to widen small cracks in plaster to give a key for the filler. Use the corner of a scraper or filling knife to remove any loose plaster and to open up and deepen the crack. Try to undercut the crack to provide a key for the filler.
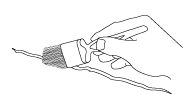 Use a dry paint brush to clean the crack of loose dust and dirt.
When the filler has been mixed and ready to use, dampen (but don't soak) the plaster in the crack by using a moistened brush.
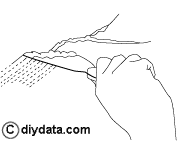 Use a filling knife to press the filler into the crack along its length so that the filler is proud of the surrounding plaster.
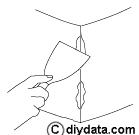
Use a wet filling knife along the line of the cracks to level off the filler.
The filler used in larger cracks may shrink as it hardens, and the surface may need to be built up using repeat coatings of filler. Between each coat, lightly sand the surrounding surface and moisten the previous filler before applying the next coat of filler.
Repairing chipped plastered corners
Modern plastered external corners usually incorporate a metal corner strip and are so protected from damage. However, in older properties external corners were often made using render and plaster alone and can suffer damage from knocks and scrapes. Repairing such damage can be easily repaired using a suitable filler.
Start by brushing the damage clean of all loose dust and dirt.
Dampen (but don't soak) the area of damage using a moistened paint brush or water spray.
 Use a wide filler knife to apply filler to the damage, work it into the damage to make sure that there are no air holes or voids in the filler.
Use the knife to get the filler level with the surrounding plaster.
 When the filler has started to harden, use a wet finger to shape the corner to the profile above and below the damage.
The filler used may shrink as it hardens, and the surface may need to be built up using repeat coatings of filler. Between each coat, lightly sand the surrounding surface and moisten the previous filler.