Roofing with interlocking tiles
positioning the battens - laying the tiles - cutting - fixing - verges - ridges - illustration
Safety: Working on a roof involves working at height (even on a bungalow), so always use scaffolding or other stable platform, never use just ladders.
Single lap interlocking tiles are possibly the quickest and easiest to lay because one the roof is battened, the tiles just hook on and overlap each other - most common are the concrete type but other materials/shapes are available.
Positioning the battens
The supplier of the tiles should recommend the spacing up the roof between the battens (known as the 'gauge'), this usually varies according to the pitch of the roof and the degree of exposure.
The 'gauge' is in fact the same as the 'margin', which is the length of the tile exposed.
The 'gauge' quoted by the supplier is the minimum required, you will need to establish the 'gauge' you require for your roof - see our page "Fitting felt and battens" for details of this calculation.
Laying interlocking tiles
At the top end of these type of tiles there is a single nail hole and, on the underside, two protruding nibs for locating the tiles on the battens. Fitting these tiles is simply a matter of starting at the eaves and hooking the nibs over the wooden battens then laying the next tile along side so that it overlaps its neighbour with the nibs hooked on the batten. A point to remember is that most of these tiles have the underside of the overlap on the left, so you need to work right to left.
The tiles going up the roof are normally directly above each other, there is no need to stagger them as the side joints are automatically sealed by overlaps.
 This layout gives a single lap covering, (i.e. the top part of each tile is covered by just one tile). The overlap will depend upon the slope of the roof - the steeper the slope, the smaller the overlap required.
Cutting
Use a mechanical means (such as a disc cutter) for cutting concrete tiles, however it can take a bit of practice to get a neat, clean cut using a disc cutter freehand.
Fixing
Aluminium nails should be used in preference to galvanised nails as aluminium will not corrode whereas the galvanise coating will tend to. Alternatively copper or stainless steel nails can be used.
It is not necessary (nor desirable) to nail every single tile - nailing as described here will provide a fully functional roof while allowing individual tiles to be remove later if necessary. Every tile along the eaves, up verges and along the ridge should be nailed, but otherwise only nail every fifth tile horizontally, and every third tile up the roof.
Do not overdrive the nails, there is not even any need for the nail head to come in contact with the tile - overdriving the nails risk damaging the tile (from the head of the hammer hitting the surface) - the tiles tend to be brittle and can easily be broken.
Start aligning and nailing the tiles at the right-hand eaves - work away from this point along and up the roof nailing as appropriate.
Verges
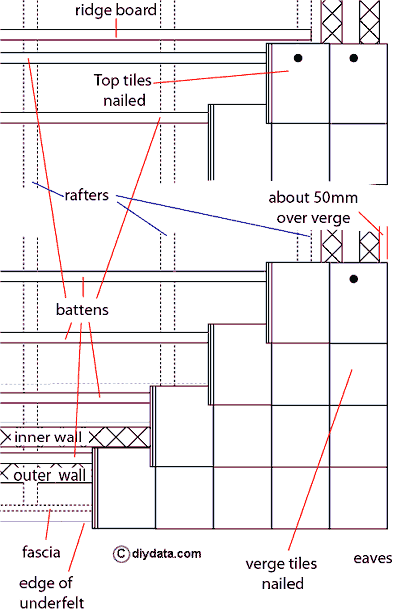
All tiles on a verge should be nailed to the battens are they are exposed, getting a neat finish to the verge as the sides of the tiles have either the under or over lap; ideally these should be cut off when aligning them with the verge. Alternatively, special verge tiles (which incorporate a downturn) are available in some ranges which just cover the join - plastic verge covers are also available which do a similar function.
Where ordinary tiles are used to the verge, these should be trimmed (to remove the over or under lap) and bedded onto cement mortar or secured using special clips before nailing - where clip are used, there will be a need to seal under the tiles using mortar if barge-boards are not used.
Ridges
The ridge and hips are finished with ridge tiles, normally the same colour as the roofing tiles. Where ridges meet (such as where a hip ridge meets a main ridge), the ridge tiles should be trimmed so that the ends of the ridge tiles are parallel when fitted.
The ridge tiles can be bedded on and jointed with cement mortar (3:1 sand:cement), it often looks better if a coloured pigment is added to the cement so that it is similar to the ridge tile. (See fitting ridge tiles)
Illustration for laying interlocking tiles

