Fitting window glass
Although double glazing is widely used in modern houses, there are still some single glazed windows around and this article deals with fitting new glass in these single glazed windows.
Safety when working with glass:
Pieces of broken glass and the edges of cut glass can be sharp and dangerous, so wear suitable safety protection (thick gloves and eye protection) and a garment with long, thick sleeves.
Also consider your surroundings; if the window is at first floor (or above), it is often better to remove the sash so it can be worked safely - if the window is non-opening, this won't be an option so you will need to take additional precautions to prevent anyone from walking underneath while you are working.
When working with glass at height, always use a work platform, don't try to work from a ladder.
With the window frame ready for glazing (see our article for removing damaged glass), the first thing to do is to obtain a new piece of glass if you haven't already done so. Measure the height and width of the opening between the sides of the rebates - the pane of glass needs to be 3mm (1/8in) smaller in both dimensions. The glass supplier should be able to recommend the thickness of glass required (it usually depends upon the size) - remember that glass for doors, or next to doors, needs to be toughened glass and glass is normally held in doors by beading rather than just putty.
Linseed Putty is the traditional material used for fixing glass panes and is still the most commonly used; however other types of putty are now available - see the section at the bottom for advice for these other puttys.
Your glass supplier should also be able to recommend how much putty you will need to fit the glass - as a rough guide, 500g (1 LB) of linseed putty is enough to fill about 4m (13ft) of normal window rebate.
Fitting the glass
Linseed putty needs to be 'worked' a bit before use. Take a handful and work in your hand until it is of an even consistency:
- If the putty feels hard and crumbles, add a drop of linseed oil.
- If the putty is very oily, roll in on some newspaper to remove the excess.
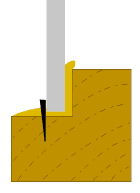
 Once the consistency of the putty is smooth and even, work it into a 'thick string', lay it in the rebate and push it into the corner with your thumb.
 When the putty has been applied all around the opening, set the new pane of glass into this bedding. Line up the sides of the pane to give equal gaps each side and lower the bottom edge onto the putty in the lower rebate.
Push the glass back into the recess, only apply pressure near to the edge of the pane and push it back so that the bed of putty behind the glass is about 3mm (1/8in) all the way round.
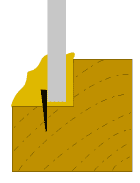
With wooden frames, hold the pane in place by taping in sprigs spaced about 200mm (8in) apart, use the square side of a chisel as a 'hammer'. The sprigs need to be low enough that the finishing putty will cover them while still holding the glass.
For metal frames, hold the pane in place by using the appropriate clips in the holes pre-drilled in the rebate.
 Take up the putty again, work it into a 'thick string' and press it around the front of the pane covering the sprigs.
 Cut away the excess putty from inside the window using a putty knife, dip the putty knife in water to stop it sticking to the putty.
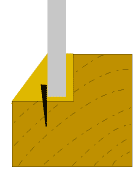
Moving to the front of the window, use the putty knife to shape and cut away the excess putty - again, dip the putty knife in water to stop it sticking to the putty. The excess putty on the top and sides should just fall away into your hand, when trimming the bottom edge, you will need to lift the excess away.
The angle of the putty should normally be about 45 degrees, take particular care at the corners where the vertical and horizontal angles meet.
Use methylated spirits to clean any putty smears from the glass surfaces.
Leave the putty for about 2 weeks to harden before painting it, the putty should be painted within a month. Overlap the finish coat of paint onto the glass to provide a weather seal - note that primer and undercoat does not adhere to glass, so only the finishing coat should overlap.
Other puttys
The other puttys on the market do the same job as linseed putty, but may be for special installations or have a longer shelf life or different period before overpainting - check the label for details.
Some puttys come in cartridges to be used with a sealant gun, you just squeeze the putty into the rebates, fit and fix the glass, squeeze some more putty around the front of the glass and smooth off - very much as above, but just using a sealant gun with a cartridge rather than applying linseed putty by hand.
