Man-made board
page 1
General
Store any sheet material in dry conditions, stacked flat. Do not place directly on a floor surface (unless a dry, timber floor).
Always use sufficient bearers to prevent the panels sagging or distorting. Care should be taken to protect edges.
Where the panels are to be stored for a prolonged period, additional bearers should be installed.
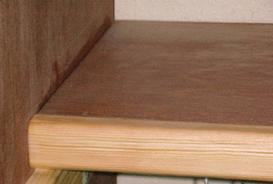 Sheet material tends to sag if a load is applied to it (such as books on a bookshelf), the sag does not immediately appear but will gradually develop over time.
Where possible, fit a support batten to all sides, This is often fairly easy along the ends and the back of the shelf - the front can be more of a problem.
The picture to the right shows the use of a piece of machined softwood (50x50) along the front edge of a shelf which not only adds an attractive finish, but also provides added stiffening. This shelf is about 1.2m unsupported; for shorter lengths, smaller sized softwood can be used.
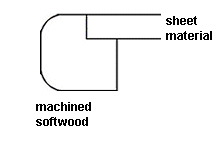
Right shows a sectional view of the machined softwood used to support the front of a shelf made from sheet material.
Sheet material is often supplied in large sheets, these can be heavy and awkward to move.
To cut the sheets accurately using a power saw, fix a batten across the sheet to guide the side of the saw's sole plate. Make sure that the batten is not too thin as it may flex sideways as you work along it.
Only cut sheet material which is well supported and stable, remember that having cut though the sheet, there is going to be an offcut; nothing to worry about if it is a 25 mm strip of 3 mm ply (but you will still have to hold it), but it will need full support if it is half a sheet of 32 mm ply. If the offcut is heavy and unsupported, it will twist away before the cut is complete and cause damage to the cut edge, and possible damage to the saw/ injury to the operator. Always take the required safety precautions.
Plywood
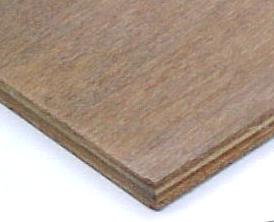 Plywood is probably the most widely available manufactured board material. It is made by bonding together a number of thin veneers of softwood or hardwood - or a combination of each. There is always an odd number of veneers and the direction of the grain runs alternately to give the material strength; the more veneers used, the stronger the plywood. Both the type of glue and veneers determine the suitability of a sheet for a particular application. The finish quality of plywood varies enormously, some have attractive grains while others can have a large number of knots.
- Exterior grade plywood (WBP - Water and Boil Proof) is specially made using a water-resistant adhesive to withstand a certain amount of moisture and can be used for outdoor constructions - sheds etc. and is sometimes used as a cladding material, particularly for insert panels under windows. WBP does require additional protection (paint or varnish) to protect the outer veneer.
- Internal plywood is of a similar quality as Exterior grade but it does not use water resistant adhesive. It can be used for wall panelling, flooring and furniture.
- Shuttering Ply is used in the construction industry for making shuttering boxes for containing concrete while it goes off. Although water resistance to a degree, the sides of this material are not finished with a decorative veneer and is generally not suitable for use where a quality finish is required.
Marine Plywood is made with waterproof adhesive so that it will stand immersion in water, the veneers themselves will not last forever under water so the material should still be finished with paint or varnish.
Plywood is normally available in 2440 x 1220 sheets (or subdivisions) and in thicknesses from 3 to 35 mm.
Working with plywood
If the sheets are to be used in a centrally heated room, store them in similar conditions before use so that the moisture content of the sheets will stabilise before installation - this will avoid shrinkage later.
Cutting
To avoid damage to the finishing face, cut into the panel from that face - for hand sawing have the face upwards, for power sawing have the face downwards. To reduce the damage, score through the outer veneer on both sides of the sheet using a sharp knife before starting to saw.
Thin sheets (up to 3mm) can be cut using a sharp knife.
From 3 to 6mm use a tenon saw.
From 6 to 12mm thick, use a fine tooth panel saw.
For thicker sheets use a coarse tooth panel saw.
Power saws can be used with thicker material but are more likely to damage the outer skin where the saw cuts away from the material.
Fixing
Plywood may be fixed in place with adhesive and screws or nails.
Generally only small screws grip well in thick plywood itself but even then they will not stand up to repeated changes in force. When fitting hinges to any thickness, use bolts with large washers and nut to 'squeeze' the sheet. It is not practical to screw or nail into the edge of plywood.
Where a corner joint is required, fit a softwood batten in the corner so than both sheets of ply can be fixed to it.
For thin material, always fix plywood to a pre-made frame, use glue and panel pins (on about a 200mm pitch), use a punch to knock the head of the pins below the surface. The frame should support all edges of each plywood sheet and at about 400mm centres (for 6mm ply), 600mm centres (for 9mm) or 900mm centres for thicker material.
Knocks to the edge of ply can cause damage to all the veneers which is hard to rectify, so fit a thin strip of softwood along the finished edge or put a rebate in the frame so that the edge of the plywood can be recessed. This will also improve the appearance as the edge of plywood is not very attractive.
When gluing plywood, roughen the surface with coarse abrasive paper and brush clean before applying the glue. Spread the glue evenly and apply pressure.
Finishes
Plywood which is supplied with a decorative veneer can be varnished or painted but to get a really smooth surface will need good preparation as most plywoods are not as smooth as planed timber.
Sheets are also available with pre-printed faces such as mock panelling.
Edge laminated softwood board
 At first sight, edge laminated softwood board can look like one piece of timber, but it is actually made up of narrow (25 to 100 cm) strips of softwood glued edge to edge. This board is ideal for making furniture where the natural gain can be left exposed.
Boards are available in a number of thicknesses (15, 18, 22, 28mm), widths (400, 450, 500, 600 mm) and lengths (1.2m to 2.1m). This wide choice means that the appropriate sheets can be selected to suit the job while minimising waste. Some DIY superstores stock a surprisingly small range, so it may be necessary to visit a 'real' builder's merchant to see a wider range.
Working with edge laminated softwood board
Edge laminated softwood board can be worked as ordinary softwood. Boards should be stored flat.
Fixing
Edge laminated softwood board can be screwed, nailed or glued just like ordinary softwood timber.
Finishing
Generally where edge laminated softwood board is used, it is desired to leave the grain visible by finishing with stain, varnish, wax, or actually leaving it untreated. Most common formulations for these finishes can be used without affecting the board.
Chipboard
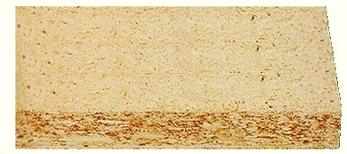 Chipboard is made by bonding together wood particles with an adhesive under heat and pressure to form a rigid board with a relatively smooth surface. Chipboard is available in a number of densities; normal, medium and high-density. Normal density is fairly soft and 'flaky', high-density is very solid and hard (often used for worktops and fire doors) - medium density is somewhere in between.
There are exterior grades of chipboard available but most are only suitable for internal use as all but high-density tend to soak up water like a sponge. Once water logged, chipboard tends to swell and breakdown.
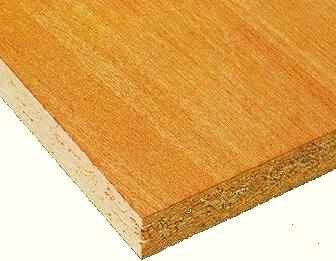 Veneered
Chipboard is widely used for self-assembly furniture, work surfaces, wall linings and partitions. High-density chipboard is often used as a basis for the carcasses of kitchen furniture, worktops, and flooring - this is hardwearing, rigid and heavy.
Other grades available are standard, flame-retardant, flooring, and moisture-resistant.
Chipboard is normally available in 2440 x 1220 sheets (or subdivisions), finished veneered sheets are available in smaller sheets so that the four decorated edges do not need to be cut. Thicknesses range from 12 to 25 mm.
Flooring grade chipboard is marked 'flooring' and no other should be used. It is normally available in 2440 x 1200 and 610mm sheets and in 18 and 22mm thicknesses with tongued and grooved edges for easy laying and fixing. Before using flooring grade material check it is suitable for your floor joist spacing.
Working with chipboard
Apart from high density chipboard, the finish after cutting is generally poor. As with plywood, veneered chipboard should be cut with the saw blade going into the finish face to prevent the finish veneer chipping. To reduce the amount of damage when cutting chipboard, apply a strip of masking tape along the line of the cut and cut through the tape.
A panel, circular or jig saw can be used.
Fixing
Nails, pins and screws may be used on normal chipboard, but they should always be fixed through the chipboard and into a support. If you pin, nail or screw into chipboard, the fixings may pull out easily. With high density chipboard nails, screws and fixing can be used. The screw-holding power is improved if double-threaded or chipboard screws are used. Follow the manufacturer's instructions for fixing special purpose boards.
Any woodworking adhesive may be used with chipboard although when it does fail, normally the outer 'chips' separate from the rest of the board. Do not rely on gluing only to support heavy weight.
Finishing
Generally only laminate chipboard will give a satisfactory finish although laminate or self-adhesive decorative film can be used.
Edging (normally self adhesive) strip is available to add laminate type finish to sawn edges of pre-laminated chipboard.
Ordinary chipboard is fairly unattractive on its own but if you want to paint it, use oil based paints - using water based paints can cause chipboard to swell.
Blockboard
 Blockboard is composed of a core of softwood strips (up to about 25mm wide) placed edge to edge and sandwiched between veneers of hardwood, the 'sandwich' is then bonded under high pressure.
An interior grade adhesive is normally used, so blockboard is not suitable for use out of doors.
When using blockboard for such items as a door or a long table, make sure the core runs lengthways to give maximum strength. Blockboard can be used for shelves, doors, panelling and partitions.
Blockboard is normally available in 2440 x 1220 sheets (or subdivisions), thicknesses tend to be limited to around 30mm.
Working with blockboard
Fixing
Providing that screws or nails miss the joints of the inner strips and enter the strips in a sound position, they will give good fixings - but it is a bit of a gamble as you cannot see where the fixing is going.
Finishing
The edges of blockboard do not clean up well and are not very attractive, so cover exposed edges with a decorative strip of softwood or fill and paint them.
The surfaces of standard boards can be painted, while pre-finished boards are available with a variety of applied surfaces such as decorative wood veneers and plastic laminate facings.
Blockboard has a good resistance to warping if both sides are left natural or painted/papered. If only one side is finished, then surface tensions build up which will cause the sheet into a bend.
