
Wooden Fence Posts - options for the posts
bury post in ground - spike support - baseplate - foundation socket - fence post to wall
There are five basic methods of erecting a garden fence post:
- Bury the bottom of the post into the ground.
- Use a spiked support with a post socket atop - these are just driven into the soil and the post sits in the socket.
- Use a socket with a baseplate which is bolted to a flat surface - such as a concrete path.
- Use a socket which is anchored in a block of concrete - this prevents the bottom of the post from rotting away below ground.
- Fix the fence post to a vertical wall - generally only an end post can be fitted in this way.
Whichever method is used, the posts must be vertical.
Timber posts are normally just square timber. Most fence posts are treated at the factory to prevent rot and insect attack and will not require any preservatives for the first year or two. However, if a post is cut or drilled or to increase protection where the post is to go below ground level, treat the areas with appropriate timber preservative.
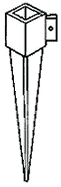
1. Bury the post.
 When sinking the posts into the ground, allow the following foundations in normal soil:
- Posts up to 1.40 m (approx. 4 ft 6in) the holes should be 450 mm (1 ft 6 in) square and 600 mm (2 ft) deep.
- Posts above 1.40 m (approx. 4 ft 6in) the holes should be 450 mm (1 ft 6 in) square and 750 mm (2 ft 6 in) deep.
Position the post in the hole and hold it upright, use a spirit level to check that it is vertical. Ram the earth around the post or preferably embedded using large rubble or old bricks at the bottom of the hole with firmly compacted earth above. For even better results insert some rubble around the foot of the post and top off with a dryish concrete mix (1:2:4 cement: sand: coarse aggregate) - brace the post while the concrete hardens. Slope the top of the concrete away from the post so that rainwater will run off.
2. Socket with a spike.
 A spiked support can be driven into soft ground, avoid these spikes if the subsoil is clay, and the ground drys out during the summer. The ground will shrink away from the spike and it will become loose.
Use a sledge hammer to drive these supports into the ground. To avoid damaging the rim of the socket, use a special driving tool or fit a piece of sawn off post into the socket.
Drive the spike into the ground until the base of the socket is level with the ground. Check regularly that the support is going in vertical and square to the run of the fence, if it begins to twist out of line, use the handles on the driving tool to realign the support. If you are unable to set the support accurately, lever it out and start again.
3. Socket with a baseplate.
 For erecting a fence over a concrete area, the baseplate incorporates securing holes.
Position the support and then drill the fixing holes in the concrete. Use a sharp masonry drill bit in a hammer action electric drill.
Bolt the post support down onto the concrete. If the surface is uneven, you may need to pack under the baseplate to make sure the socket is upright - odd pieces of old roofing slate are ideal for this.
4. Foundation sockets.
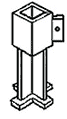 The base of these sockets is buried in concrete, they prevent rotting of the bottom of fence posts below ground level.
Dig a hole to take the concrete foundations, position and level the support (with the bottom of the socket about ground level) and pack around the bottom with rubble. Embed with a dryish concrete mix (1:2:4 cement: sand: coarse aggregate).
Check the level and height of the insert before leaving the concrete to go off.
5. Fixing to a wall.
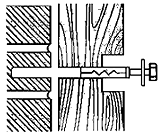 Where the end of a fence abuts a wall - make sure that the wall is structurally sound.
The post can be cut off at ground level and bolted to the house or garden wall using expanding bolts bedded into holes in wall. Insert the fixings into the masonry (a brick or block) rather than the mortar - check the positions for the holes before you drill or cut the timber.
For posts over 1 metre, use at least three anchor points. Cut the timber away around the anchor points so that the head of the fixing is below the level of the post. Hold the post against the wall, off the ground, and drill through pilots holes already drilled in the post.
Insert the anchor bolts and tighten onto the wall. Ensure that the post is vertical; pack out between the wall and the post if necessary.
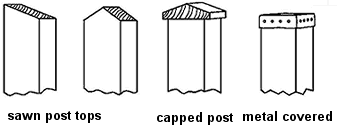 The
top of each post should be cut before erection at an angle or capped to allow any rainwater to drain off.
The
top of each post should be cut before erection at an angle or capped to allow any rainwater to drain off.
If necessary, the fence post should be cut to length before they are erected, treat all sawn areas with a good quality wood preservative.
bury post in ground - spike support - baseplate - foundation socket - fence post to wall