
Slide valve washer replacement
dismantling a slide vale - reassembling a slide valve
A leaking slide valve will cause water to continually drip into the tank and will, over a period of time, raise the water level to the overflow. So, if water drips out of the overflow from a lavatory cistern or water tank after a period of time, the first thing to check/replace is the washer in the ball valve.
NOTE: Please read through these notes before starting to replace a washer in a slide valve, one problem which may be encountered is a seized end-cap on a brass slider (see here below) which will prevent completing the change of washer. It may be worth buying a replacement nylon slider before starting the work so that if the problem is encountered, the complete slider can simply be replaced - most sliders used in the UK are a standard diameter (about 5/8th inch - nearly 16mm).
Before you start you will need to turn off the water supply to the tank/cistern - there should be no need to drain the tank however pressure from the floating ball may make it hard to remove (and then replace) the float arm, so some water may need to be drained to take the pressure off the float arm.
Dismantling a slide valve
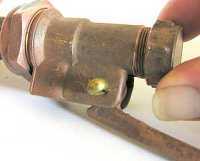 Start by removing the end cap from the body of the valve - the cap may need to be loosened using a set of silsons or a large pair of grips.
 Remove the split pin on which the float arm pivots and remove the float arm from the valve body. The open ends of the pin will need to be squeezed together with a pair of pliers so that the pin can be withdrawn through the holes in the valve body.
 Remove the slide valve from the end of the valve body. It may be necessary to use a small screwdriver through the hole underneath (where the float arm originally located) to move the slider back so that it can be griped with the fingertips and withdrawn.
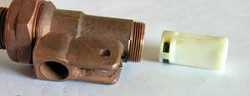
Two types of sliders are commonly used, brass with a screw end cap or nylon (as shown here). Whether the slider is brass or Nylon depends largely on the age of the ball valve - they are interchangeable and not specific to particular uses.
- With a brass slider, the end cap needs to be unscrewed, the old washer replaced and the end cap re-secured. A major problem is that most slide valves have been operating for many years before the washer needs attention and the end cap is usually seized solid with the body of the slider. It may be possible to loosen the end cap by gripping it with a pair of pliers and inserting a screwdriver into the body to get some purchase.
If the end cap and slider body will not part, the easiest thing is to fit a new replacement nylon slider. -
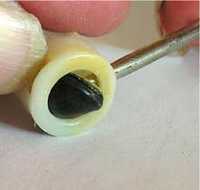 With a nylon there are normally slots around the end with the washer (these slots are easy to see on the left of the slider in the illustration above).
To remove the old washer, a small screwdriver is used through one of the slots to force the washer out (as shown right).
With the old washer removed, the new washer is simply forced into the locating groove.
Reassembling a slide valve.
Reassembling a slide valve is just the reverse of dismantling one, points to watch are:
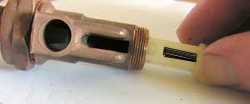 When fitting the slider into the end of the valve, make sure that the washer end goes in first and that the slot in the slider lines up with the slot in the body of the valve where the end of the float arm goes.
- After the float arm has been located into the slider and the split pin fitted, slightly open up the split pin so that it cannot be removed without use of tools.
- When fitting the end cap, there is no need for it to be tightened other than a small 'nip up' - if it does come loose and drop off, water entering the valve will flow around the slider and out of the end rather than being directed down through the hole in the bottom of the valve body.