
A simple Solar Water Heater
Solar collector design - Solar collector assembly
The total amount of solar radiation falling on each square meter in the UK is around 1000kWh per year - of this, it should be possible to collect between 25% and 33% .
For a typical domestic water heating installation, a total of about 4 sq. metres is considered appropriate.
The amount of water which can be directly heated to a 'usable' temperature is fairly small so it is usually better to use the panel to preheat cold water in a separate tank before it is fed to the main hot water tank.
The solar storage tank should be about 50 litres per 1 square meter of panel, however this is not very critical. The tank and all interconnection pipework should be well insulated to avoid loss of collected heat.
The best position for the panel (UK) is in an unshaded position angled to face just west of south at about 35 degrees to the horizontal.
Other orientations between SE and SW and various tilts from 10 to 50 degrees cause only small reductions in the overall energy collected.
Flat Solar Collector Design
The simple, single panel design shown here uses a standard pressed steel central heating radiator as the solar collector.
These are relatively cheap and readily available either as new or second-hand (if using a second-hand radiator panel, remove any decorative paint from the front surface and re-prime as necessary).
The thermal efficiency of a collector using a central heating radiator should be comparable with many commercially available designs.
However the relatively large water content will make it slow to respond especially at low levels of solar radiation.
The panel should be a single panel without fins and with tapped connecting holes at all four corners so that the necessary 'diagonal' flow of water is easily achieved.
Other types with only two connections can be used providing that the connections are at diagonally opposite corners.
The panel needs to be painted with matt black oil paint to give a high absorbent surface. All pipework within the case should be insulated to prevent collected heat escaping back into the case.
The size of collector used in this design is not defined other than by 'h' and 'w', this allows you to build the case to suit your particular size of radiator panel.
Try to keep the size of panel about 1 sq. metre or less, larger panel are heavy and can be difficult to handle especially on a roof. If you can build the case in it's final position, the job will generally be easier.
The case for the panel is a simple wooden box made from pressure treated timber (alternatively a good quality timber preservative could be used). Single front cover glazing is shown, using 3mm window glass - for cases over about 1 metre in any direction, use separate pieces of glass, you'll need to add addition glazing support bars across the front of the panel to fix them. Always measure the completed case before you buy the glass and buy it cut to size - leave a 2mm gap around the glass to allow it to expand. The front glazing cover should overhang the lower edge of the case by about 12 mm to allow rain to drain off without running onto the case. Glazing clips fixed to the inside of the lower edge of the box are used to hold the cover in position.
The insulation fitted behind the collector needs to be of a high temperature type as the temperature can reach up to 140 degrees Celsius if the water is not circulated through the panel. Other, cheaper alternative materials (such as polystyrene) are unsuitable as they can shrink or even melt. Air movement between the back of the panel and the insulation should be avoided so make sure that all gaps are filled.
It is virtually impossible to make the collector totally water tight over a long period, even if the rain is kept out, some internal condensation will occur. To prevent this becoming a problem, insert three or four 5 mm 'breathe' holes along the lower side of the case just in front of the insulation.
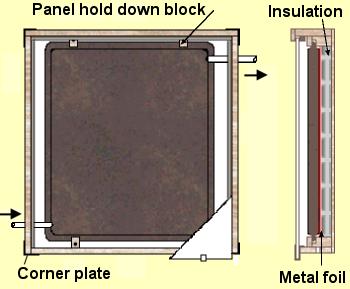
Cut away of solar collector
Material list for the solar collector
Note: most dimensions are shown h+x and w+y - where h and w are the height and width of the particular panel you are using. Measure these before you start and just add x or y as appropriate.
- Timber - Softwood, planed all round, preferably tanalised or, alternatively, treated with a good quality timber preservative. Timber sizes shown are standard nominal size - it will be smaller having been planned.
| part identity | size (par) | length | quantity |
| A | 125x25 | w+150mm | 1 |
| B | 125x25 | h+125mm | 2 |
| C | 100x25 | w+100 | 1 |
| D | 25x12 | w+100 | 1 |
| E | 25x12 | h+75 | 2 |
| F | 50x25 | h+100 | 2 (or 3 where w is greater than 1metre) |
| G | 45x12 | W+150 | 1 (mitre corner (both ends)) |
| H | 45x12 | H+150 | 2 (mitre corner (one end)) |
| J | 50X50 | cut to suit | 4 (or 6 where w is greater than 1metre) |
- Plywood Exterior quality 9mm, h+150 x w+150
- Absorber Press steel, single panel radiator without fins - with termination at all four corners to enable a diagonal flow (or at 2 diagonally opposite corners)
- Glass w+95 x h +135mm, 3 mm, (measure the collector box to check the size before you purchase - fit separate pieces of glass to keep all dimensions less than 1 m, this will involve additional support bars across the front of the panel as required)
- Glass retaining clips - 2 per maximum 1 m edge
- Corner plates (250mm x 100mm, mild steel - bent 90 degrees) 4 off
- Insulation 50 mm thick, high temperature mineral fibre
- Connecting pipework and connectors - copper, size and quantity to suit
- Metal foil (such as kitchen foil) as required
- Glue - PVA wood glue as required
- Putty or glazing tape as required
- Screws etc. as required

Basic Solar Collector Case
Assembly of the solar collector
- Cut the timber, treat all sawn ends with a good quality timber preservative.
- Paint the collector panel using as thin a coating as possible of high temperature, black, oil base paint (black car exhaust paint is a good suggestion).
- Glue and screw the sides together (A, B, and C).
- Glue and screw the backing ply onto the frame.
- Screw the corner plates into position.
- Glue and screw (from the back) the cross braces (F) into position.
- Drill a number of 5 mm drain holes in the lower side, just in front of the insulation.
- Lay the panel in position within the case, mark the position of the pipe entry points on the frame. Remove the absorber and drill the holes for the pipe entries.
- Glue and screw strips D and E to the inner sides of the case so that they offer a flat surface for the glass on the same line as the top of the lower side (C).
- Cut and fit the insulation between the cross braces and the case.
- Cover the insulation with metal foil.
- If not being built in position, this is a good time to position and secure the case.
- Lay the panel in the case and secure using the holding down blocks on the cross braces.
- Fit the pipework between the panel and the rest of the system, fill the gaps around the pipes where they enter the case using a suitable flexible sealant.
- It's probably best to leave the front cover off until the system has been filled with water and the system checked for leaks.
- Fit the glazing retaining clips to the lower side of the case.
- Using putty or glazing tape, fit the front cover and secure by screwing strips G and H to the sides of the case.