
Repointing walls
Cleaning out the old mortar - repointing mortar - applying the mortar
- pointing finishes
 With
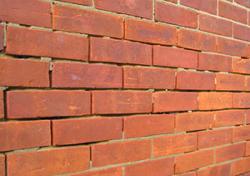
exposure to wind, rain, frost etc, the mortar holding bricks (or stone) together on an external wall will often start to crumble away and fall out. On older properties, the pointing will actually be a harder mortar than the bonding mortar, so once this is dislodged, the softer bonding mortar will become exposed and wear away quite quickly.
With
exposure to wind, rain, frost etc, the mortar holding bricks (or stone) together on an external wall will often start to crumble away and fall out. On older properties, the pointing will actually be a harder mortar than the bonding mortar, so once this is dislodged, the softer bonding mortar will become exposed and wear away quite quickly.
This sort of damage can take decades to occur but it is important to repair the pointing as necessary otherwise water will increasingly penetrate and damage the wall.
If the damage is limited to a small area, just that area can be repaired, however this repointed area will tend to then stand out. Generally a whole wall face will have weather in a similar way, so the whole wall will need repointing at the same time.
Repointing is time consuming to achieve a good overall appearance but is worth the effort.
Repointing above the height you can comfortably reach from ground level requires scaffolding or an access tower, don't try to work from a ladder, it is uncomfortable and unsafe.
Cleaning out the old mortar
Work down the wall (this will avoid any debris falling on to areas which have already been repointed), working on about 3 rows of bricks at a time.
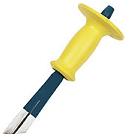 On soft mortar use a hook or old screwdriver to rack out the old mortar, alternatively use a 'plugging' chisel (right) and club hammer - start by taking out the vertical joints, then work on the horizontal joints (if you clear the horizontal joints first, you will risk chipping into the brick above or below when you come to clear the vertical joints). Remove the old mortar back to a depth of 8 to 12 mm from the front face (at least equal to the width of the joints) - where the old mortar is loose beyond this depth, clean it back until fairly firm mortar is located. Some old brickwork can have very narrow joints in places - where the hook or chisel is too wide, use a masonry saw, or hacksaw blade to remove the mortar.
TIP: Don't try to speed up the job by using a disc cutter or angle grinder, it is impossible to keep the disc lined up with the mortar beds and every miss alignment will damage the neighbouring brick.
Make sure that the old mortar is removed from the top, bottom and sides of the bricks so that the new mortar will adhere to them.
Any damaged or loose bricks should be replaced before proceeding with the repointing. When refitting such bricks, make sure that the new mortar bed is well back from the front face so that they can be finished with the new repointing
The repointing mortar
The usual mortar for repointing is either a 6:1:1 mix of builders sand/hydrated lime/cement or a 3:1 mix of sharp sand/hydrated lime. Measure the amounts carefully so that each batch will set to a consistent colouring.
Don't use a simple sand/cement mix as it will trap water in the wall and any frost will loosen it; also, it will tend to set too quickly and form weak bonds to the bricks.
Only mix up a small amount of mortar at a time (about half a bucket) as repointing is time consuming so you won't do a very large area before the mortar will start to go off.
The consistency of the mortar is very important, (if it is too wet it is hard to apply and will get on the face of the bricks), it needs to be fairly firm so that you can cut it into narrow strips with the trowel and the strips stay in shape. As a test, the mortar should stand up on the trowel without sagging.
Repointing
Don't attempt to re-point if heavy rain or frost are expected.
Remove all dust and debris from the joints using a large soft brush, and then dampen the joints using either a wetted soft brush or a fine watering spray - you need to damped the existing mortar at the back of the joints as well as the sides of the bricks.
 Put a small amount of mortar on a hawk and, using a pointing trowel flatten the mortar so that it is about as high as the joints between the bricks with a fairly straight edge on one side.
Repoint the bed (horizontal) joints first and then the head (vertical) joints working downwards and sideways. Concentrate on about one square metre of wall at a time.
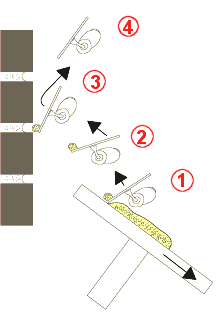
- Tilt the hawk away from the wall and use the trowel to chop off a strip of mortar about the width of the pointing from the front edge of the mortar. Move the trowel towards the wall at the same time pulling the hawk away from the wall. A narrow strip of mortar will now be on the edge of the trowel.
- Keeping the trowel at an angle, move the mortar to the joint to be filled.
- Use a twisting wrist action to pull the mortar against the upper brick and pull the trowel away.
- Now having an empty trowel, repeat the process to build up the amount of mortar in the joint.
- When an area of joints has been filled, use the appropriate technique (as shown below) to give the required finish.
Pointing finishes
FLUSHED
 Flush finishing can be difficult to achieve due to the irregularities of most mass produced bricks.
This is achieved by drawing a strip of wood about 12mm wide, 6mm thick and 100mm long along the joints after the mortar has started to go off.
This is probably the easiest finish for a new diyer to achieve.
HOLLOW KEY
 Hollow key - is formed by pulling a suitable curved or round shaped piece of metal (i.e. tube or rod) along the joints.
WEATHERED
 Weathered finishing throws off rain water and is considered to be fairly durable but it is difficult for a diyer to achieve
a good finish.
Weathered finishing throws off rain water and is considered to be fairly durable but it is difficult for a diyer to achieve
a good finish.
The joint is made by drawing the blade of a small trowel, tilted slightly inwards at the top, backwards along the joint, the top edge of the trowel being in contact with the underside of the bricks above the joint being struck.
For vertical joints, the edge of the trowel is in contact with one of the side bricks and is inclined by the same amount as the horizontal joint. Keep the direction of the vertical strikes the same all over a wall, otherwise it may look peculiar.
RECESSED KEY
 Recessed key - the mortar needs to be racked out to a consistent depth from the face of the wall and then the face of the mortar
is pressed back firmly using a metal jointer tool or a piece of wood. A tool known as a 'chariot', which is designed to recess
the joint evenly, can also be used.
Recessed key - the mortar needs to be racked out to a consistent depth from the face of the wall and then the face of the mortar
is pressed back firmly using a metal jointer tool or a piece of wood. A tool known as a 'chariot', which is designed to recess
the joint evenly, can also be used.
Generally it is not recommended for external brickwork as water will collect in the recess.