
previously on shopsmith Inc
The Colonial Dry Sink
Recalling the earlier days and simpler ways of life -- in Colonial America
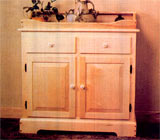 In early America, long before the days of shower massages and whirlpool tubs, the dry sink was as commonplace and functional as any fully plumbed sink in a modern, American home.
Used with a pottery basin and pitcher, it offered a recessed well on top to prevent the water from splashing out while washing or shaving.
And although its original purpose has been made obsolete by modern-day plumbing, there's still a place for this attractive piece of furniture in our homes.
The techniques used to build this project are simple enough, even for beginning woodworkers who are willing to take their time and move step-by-step through the various techniques. There's nothing particularly complicated here.
The majority of the components (including the drawer fronts) are assembled with dowels and the raised panel doors feature simple joinery, as well.
When you've finished, you'll have a handsome piece of furniture that will make a great addition to virtually any room of the house.
For the letter references in the instructions below refer to the related diagrams.
THE FACE FRAME & CARCASE
We built our example out of maple, but clear (or knotty) pine or even cherry would make a beautiful piece, as well. Start by cutting out the stiles and rails (A,B,C,D,E) used in the face frame. Making this assembly first will speed-up the construction of the entire cabinet. Using the horizontal boring mode on your Shopsmith MARK V, drill the required 3/8" dowel holes in the stiles and rails as shown in the carcase assembly drawing. Glue and clamp these together, being careful to keep them square during assembly. As an alternative (to doweling), these stiles and rails could be assembled using a biscuit joiner and small, #0 biscuits.
Set this assembly aside and glue up the stock for the sides (F), bottom (G) and top (H). As an alternative, you may wish to make the bottom (G) out of veneered plywood. Once they've dried, sand their surfaces smooth. Next, use a dado blade set-up or your jointer to cut the 3/4" wide x 3/8" deep dadoes in the sides (F) that will be used to hold the bottom (G) in position…then cut the 1/4" x 3/8" rabbets in the backs of the side pieces (F) that will accept the 1/4" plywood cabinet back.
THE BASE & TOP
To make the base pieces (L,M), start by ripping your stock to 5" widths, then miter the ends (vertically) to a 45-degree angle in preparation for assembly. Be sure to cut your stock a little longer than necessary to allow yourself room for minor adjustments. Remember, you can always use your disc sander to remove a little stock, if necessary…but it's tough (if not almost impossible) to ADD stock to a board that you've cut too short!
Using your bandsaw or scroll saw, cut the curved contours that will form the "feet" of your dry sink. Shape the top edges of these pieces with a Bead Molding or Shaper cutter…or a 3/8" Round-Over Router bit . Attach the cleat strips (N,P) to the base pieces (L,M), then assemble the base with counterbored screws. Turn the carcase on its back and mount the base assembly (L,M) to it with screws.
Cut the top (H) to size and round over its front and two side edges (do NOT shape the back edge), using the same procedure (and cutters) you used for the top edges of the base. Cut all the required pieces for the splash board (V,W,X) and the splash board shelf (Y). Bevel the bottom edge of the front piece to 20 degrees and cut the angle on the front edges of the side pieces (W) to match. Using your bandsaw or scroll saw, cut the contoured shapes on the four splash board parts (W,X,Y). ). Using the same procedure (and cutters) you used for the top edges of the base assembly, shape the front edge of the splash board shelf (Y). Assemble all the parts of this section together with counterbored screws and glue. Attach the splash board assembly to the top (H), using flathead wood screws (screw up from the bottom) and glue. Screw the entire top section (with splash board attached) to the carcase, through the top brace (J) and front cleat strip (K).
THE DOORS & DRAWERS
You're now ready to fit the drawers and doors to the cabinet. Remember that the drawer fronts and doors will be 3/4" wider and 3/4" higher than the openings for them in order to leave a 3/8" lip all the way around their edges. Start by cutting the door stiles (Z) and door rails (AA) to length, according to the Bill of Materials. Be sure to double-check your measurements with your door openings before you make any cuts. With your dado blade set-up, cut the required groves in the stiles (Z) and rails (AA) that you'll need to put the door frames together. Then cut the tenons on the ends of the rails (AA). A Tenoning Jig will make this job much easier.
Next, tilt your saw table to 15 degrees and cut the bevel for your raised panel doors (BB). NOTE: We recommend using a shop-made jig to perform this operation more safely. Relieve the back of the door panels by cutting a small rabbet with your dado set as shown in the "Panel to Rail Detail" drawing. This is a "cut-to-fit" operation and you'll want to be sure to use push blocks for optimum safety. Remove just a little of he stock at a time and stop frequently to test the fit of the panel in the grooves. To prevent moisture from finding its way into your raised panels, apply whatever finish you're planning to use to your panels before you assemble them into the frame. Assemble the stiles (Z) and rails (AA) together with glue but DO NOT glue the panel into position. Friction will hold it in place quite nicely.
Now, cut the drawer fronts (CC) to size, then cut the rabbets on these and around the edges of the assembled doors. Set your Dado Blade and adjust your fence to make a cut 3/8" deep and 3/8" wide for the rabbets on the back sides of the door rails & stiles…and the top and bottom (back) edges of the drawer fronts. Then, move your fence out 1-1/8" to make the shoulder cuts for the 3/8" deep rabbets on the drawer ENDS. Next, move the fence back to 3/8" and adjust your depth-of-cut to 1-1/8" to make your final pass.
Next, rout a 1/4" wide by 1/4" deep groove in the drawer sides (DD) and fronts (CC) to hold the drawer bottoms (FF). Use your MARK V in the horizontal boring mode to drill the dowel holes in the drawer sides (DD) and fronts (CC). Since there is only a 3/8" clearance here and the dowels are specified to be 1/4" diameter, you'll have little room for error here….so Measure Twice / Cut Once! Now, drill the dowel holes for the drawer backs (EE) and prepare to assemble the drawers. First, insert the drawer bottoms (FF) into place but don't glue them. A couple of brads in he bottom edge of the drawer backs will hold them in their place.
Finally, mount the back of your dry sink (U). Sand everything smooth, clean up any dust, and apply the finish of your choice. That's it !