
Different types of nternal plaster walls
Over the years, the practice of applying plaster to internal walls has changed quite a lot, the four basic forms found in post seventeenth century buildings are:
When repairing a plaster wall, the repair should ideally be carried out using the same materials as the original wall. Modern gypsum plasters are a lot harder and more brittle that the traditional lime putty used in older constructions.
Lath and plaster
 From the early eighteenth until the mid twentieth century, internal, non-load-bearing walls were usually covered using lath and plaster techniques (see right).
The laths are the horizontal strips of wood (usually about 25mm by 6mm (1 by 1/4 inch) nailed to a vertical upright timber framework with about 6mm (1/4 inch) gap between each lath.
The traditional method of coating lath and plaster walls was to apply three layers of lime putty mixture:
- The first layer (aka the render layer) was about 8mm (3/8 inch) thick and was forced through the gaps between the laths to achieve a strong bond to the laths.
- The second layer (aka the floating coating) was about 6mm (1/4 inch) thick and was applied to achieve a smooth surface for the thin, final layer.
- The third and final layer (aka the setting layer) was about 3mm (1/8 inch) thick and was smoothed off to give a suitable finish for decorating.
Traditionally the first and second layers were typically a 1:3 mixture of lime putty to clean, sharp sand; often animal hair was also mixed in to help it bind together. The third layer was typically either lime putty on its own or a 3:1 lime putty to fine sand mixture.
One disadvantage of using lime based layers was that each layer could take up to three weeks to dry before the next layer could be applied; towards the end of the nineteenth century the practice developed to add gypsum or cement to the mixtures to decrease the time delay between each layer. These mixes were typically 1:1:6 (gypsum/cement:lime putty:sharp sand) for the first two layers and equal parts gypsum and lime putty for the setting layer.
The use of lath and plaster was largely replaced by the use of pre-manufactured plasterboard when that became available in the mid twentieth century.
See also:
Plaster
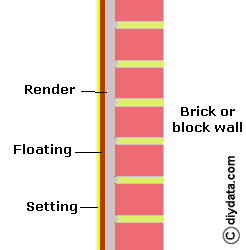 Where walls are brick, block or stone, the typical finish is plaster (see right). As with lath and plaster walls, three layers were applied - the render, the floating and the setting layers.
The plaster mixes were traditionally the same as for lath and plaster - the render and floating layers 1:3 (lime putty:sharp sand) with animal hair often added - the setting layer either lime putty on its own or 3:1 (lime putty:fine sand).
And again, towards the end of the nineteenth century gypsum or cement was added to decrease the time between layers. These mixes were typically 1:1:6 (gypsum/cement:lime putty:sharp sand) for the first two layers and equal parts gypsum and lime putty for the setting layer.
By the mid 20th century, lime was largely replaced; the first two layers being straight sand and cement renders (1:6) (without animal hair being added) while the setting layer was gypsum plaster alone.
Modern (21st century) practice tend to the use of premixed gypsum based render (also referred to as 'browning' or undercoat plaster) and finishing plasters.
See also:
Plasterboard stud walling
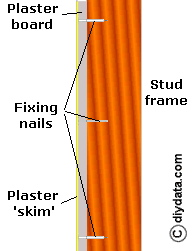 With the development of sheet plasterboard in the mid twentieth century, lath and plaster walls were largely overtaken by stud partitioning (see right).
Like lath and plaster, a basic timber framework was erected and, instead of attaching the laths, the sheets of plasterboard were simply cut to size and nailed in place. The joints between sheets were often just butted together and the whole surface skimmed with a setting plaster mixture - this, however, commonly lead to cracks in the walls along the edges of the plasterboard. Later the practice was introduced to apply 'scrim' (a fairly narrow (50mm (2 inches)) fine, flexible over-weave jute fabric or plastic tape) over the joints before the plaster skim was applied, this prevented the plaster skim from cracking along the joints.
See also:
Dry lining
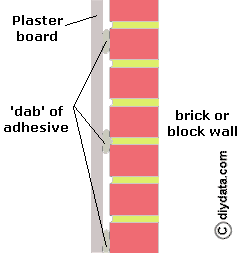 Dry-lining is a popular, quick alternative to rendered plaster on walls.
Plasterboard is simply attached to masonry walls by a series of 'dabs' of plaster adhesive.
The wall is covered by the dabs spaced horizontally and vertically about 400mm (16 inches) apart and the plasterboard is then applied and levelled.
The joints between the plasterboard sheets are then sealed by covering with scrim and a thin application of a gypsum based sealant.
The surface of the plasterboard is not covered by a plaster skin.