
Insulating a sloping roof
It's worth insulating the sloping insides of a pitched roof in order to conserve heat if the space is to be used for anything except simple storage.
It must be remembered that just because a roof space is insulated and the floor boarded, it does not mean that the room can be considered a 'habitable' room - for a full conversion of a roof space, building regulations must be met which includes suitable fixed access (not a loft ladder), lighting etc.
Before fitting any insulation to the sides of a pitched roof space, any repairs to the roof should be completed - once the insulation is in place it will be harder to spot any leaks inside the roof and any leaks will soak the insulation itself.
It is important that air is allowed to circulate between the roof covering and the insulation to avoid condensation - a gap of at least 50mm (2 inch) must be left between the insulation and the inside of the roof covering. This gap must be ventilated at the top (i.e. at the ridge) and also at the bottom (either through vents at the eaves or from an uninsulated cavity wall with open air bricks at the bottom) to allow the air to move.
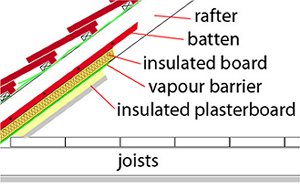
The insulation may consist of 2 or 3 layers (depending upon the type of insulated plasterboard):
- Sheet insulation fitted between the rafters - the thicker the better but the size of rafter may limit the thickness possible once an allowance has been made for the required 50mm (2 inch) air gap.
- A sheet vapour barrier fitted to the inside of the rafters - not required if the insulated plasterboard incorporates a vapour barrier.
- Insulated plasterboard i.e. plasterboard with a layer of insulating foam attached to the rear side. Some insulated plasterboard also incorporates a vapour barrier.
Fitting the sheet insulation
To locate the sheet insulation between the rafters while ensuring the air gap behind, timber battens are first screwed to the sides of the rafters. Use battens which have been treated with preservative - the simplest way is to purchase tanalised roofing battens which are usually held as standard products by most timber merchants. Do not use a hammer and nails to fix the battens, the vibrations through the roof may cause damage to the roof covering especially where the roof is old - either use screwdriver and screws or a nail gun.
Once the battens are in place, cut the insulation board to be a tight fit between the rafters and push it into the gap. If any pieces won't stay in place, use a dab of sealant on the reverse to attach it to the battens - check first that the sealant is compatible with the insulation board.
At the bottom of the rafters, the insulation board should extend down to the top of the ceiling of the room below.
Fitting the vapour barrier
Note that this stage is not required if the insulated plasterboard incorporates a vapour barrier.
With all the insulation board in place, start at the top of the roof and fix the vapour barrier to the rafters using a staple gun - fold the barrier material into a sort of 'Z' at each rafter so that the staple goes through a double thickness.
The vapour barrier needs to extend down to the bottom of the sheet insulation already fitted and turn underneath it - but make sure the cavity or air passage is not obstructed.
Where a horizontal join is necessary, overlap the barrier by about 150mm (6 inches) and make sure that the bottom strip overlaps onto the upper strip.
Fitting the insulated plasterboard
The bottom of the insulated plasterboard should meet the floor level of the roof space.
After cutting the plasterboard to width so that it fits between horizontal centres of rafters, screw the insulated plasterboard to the rafters. Stagger the horizontal joins.
Insulation an external masonry wall
Where the roof space includes an external masonry wall (such as a gable end), this can be insulated using insulation board as shown in this other article.