
Lining with insulation boards
 Lining the inside
of solid walls using insulating boards provide an effective method of insulating external walls.
Lining the inside
of solid walls using insulating boards provide an effective method of insulating external walls.
Using ordinary fibre insulating panels are quite effective but using plasterboard laminate will provide even greater levels of insulation.
Plasterboard laminate normally consists of a layer of rigid foam with a tough waterproof backing, a vapour barrier and plasterboard to provide the finished surface.
It is best to fix a timber batten frame to the wall and then fix the laminate to the frame.
Before deciding to install insulation board, ensure that the wall is sound and not subject to rising or external dampness.
Fixing the framework
- Before starting on the frame, remove all wallpaper, electrical fittings (after isolating the supply at the mains), coving, door surrounds and skirting from the wall to be lined.
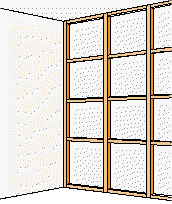 Starting in one
corner of the wall, fix a main vertical batten (50 x 25mm (2 x 1 in) timber treated with wood preservative) to the wall using screws and wall plugs.
Starting in one
corner of the wall, fix a main vertical batten (50 x 25mm (2 x 1 in) timber treated with wood preservative) to the wall using screws and wall plugs. - Measure out from the corner the width of one sheet and fix another main vertical batten so that the edge of the first sheet will come to the middle of the batten.
- Repeat along the wall until the end section, it is very unlikely that the length of wall will be a complete number of panel widths; so the final main vertical panel should be secured in the corner and the final sheet will need to be trimmed to suit.
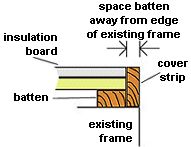 Fit a batten
along each side of any window or door on the wall, space the battens away from the edge by the width of the finishing strip so that the edge of the insulating board can be covered without projecting into the existing frame.
Fit a batten
along each side of any window or door on the wall, space the battens away from the edge by the width of the finishing strip so that the edge of the insulating board can be covered without projecting into the existing frame. - Once all the main vertical battens have been secured, fit the intermediate supporting battens (these can be of reduced size - 38 x 25mm (1.5 x 1 in)) between the main verticals. The horizontal spacing between any two vertical battens should be no greater than 450mm (18 inches).
- Providing that the height of the wall is less than one full sheet length, fix horizontal battens (38 x 25mm (1.5 x 1 in)) along the ceiling line and floor line then at immediate positions between ceiling and floor at a spacing no greater than 500mm (20 inches). If the wall is higher than a sheet length, fix a horizontal batten (50 x 25mm (2 x 1 in)) so that the sheets will meet in the middle of the batten.
Fixing the insulation sheets
- Measure the sheets and cut through the waterproof backing and foam using a sharp knife or fine tooth saw blade, snap the board and cut through the facing paper.
- Measure the positions of any electrical outlet on the wall are mark, cut them out of the sheet. Also measure and cut out any other obstruction on the wall (such as windows, doors etc.).
- Working with one sheet at a time, apply impact adhesive to the battens and in a corresponding position on the prepared sheet so the strips match up when the two surfaces are meet.
- Following the instructions for the adhesive, carefully position the sheet against the battens and press them firmly against all the battens (vertically and horizontally.
- Fill any gaps between the sheets using cellulose filler reinforced with plasterboard joint tape.
The electrical fittings, ceiling cove, door and window surrounds and skirting will need to be refitted. Around windows and doors, use wooden finishing strips to cover the edge of the insulation sheet before fitting the surround moulding.