
Stud partition framework with sound proofing
A stud partition is an easy way to divide an internal room, but the 'standard' design doesn't give much sound proofing - here we explain an alternative method of frame construction which gives increased noise reduction.
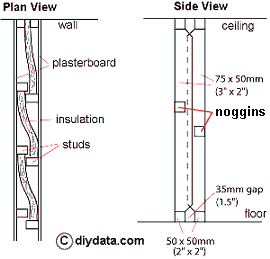 The basic structure is shown to the right. As can be seen, the partition is made up of two rows of vertical studs so that the studs and plasterboard on each side is separated from the studs and board making up the other side.
Mineral Wool insulation is arranged within the partition.
The end result is that noise (vibration) on one side is not transmitter through the frame to the other side.
Recommended sizes for the timber (all sawn) are:
- Top and sole plates (2 top and bottom) - 50mm x 50mm (2 inch x 2 inch)
- End studs (2 each end) - 50mm x 50mm (2 inch x 2 inch)
- Other studs - 100mm x 75mm (4 inch x 3 inch)
- Noggins - 50mm x 50mm (2 inch x 2 inch)
Top and sole plates.
The top and sole plates are each made up of two 50 x 50mm timbers separated by a 35mm gap. Mark the line of the sole plate first - there may be two lengths, with a gap for the doorway, although this doorway will reduce the effectiveness of the sound deadening. The gap for the doorway should allow for the door frame required and for the two studs between the top plate and the floor. It is often a good idea to position the doorway such that a full number of cladding sheets will fit between an end wall and the side of the door; this will reduce the amount of work necessary when the partition is clad. Alternatively, position the gap to suit a full number of studs (see below), this will avoid the need to cut the insulation.
Positioning the partition:
- If the floor joists run at right angles to the partition, no special requirement is necessary other than to keep the sole plate on one floor board if possible.
- If the joists run parallel to the partition, position the sole plate over a joist. This will mean that all the floorboards run under the partition, this may cause problems later if individual boards need to be lifted in future - it is worthwhile thinking about lifting some boards before fitting the partition and cutting them so that part boards can be lifted on either side of the partition.
- If the partition is being erected on a solid ground floor, place a layer of damp-proof course felt or heavy polyethylene between the floor and the timber; this will eliminate the risk of rising damp.
Before the sole plate is secured, ensure that the locations of any electric cables, water and other services under the floor are known.
Secure the sole plate to the floor, ensure that the separate lengths are in line - either use a long straightedge across the doorway or run a string line between the extreme ends. Use a couple of pieces of scrap 35mm timber to ensure the spacing between the two timbers making the sole plate. On a timber floor, nail through the sole plate timbers into the joists (not just the floor boards) at about 1 metre spacing. On a solid floor, use suitable plugs and screws.
Use a plumb line or a vertical straightedge to locate the line of the top plate. Check whether the top plate will run across or parallel to the joists above the ceiling.
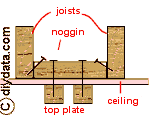 If the joists are parallel to the run of the partition, the line of the top plate may or may not coincide with a joist,. If the top plate does not line up with a joist, noggins should be fitted above the ceilings so that the top plate can be secured into somethingfairly solid - such noggins should be spaced about ever 2 metres.
Before fixing the top plate, locate and mark the positions of the joists or noggins into which it will be fixed. The joists may not be evenly spaced, so measure each individual spacing and mark them on the ceiling. Drilling pilot holes through the top plate will reduce the effort when hammering the nails overhead through the ceiling.
Secure the top plate to the ceiling - making sure that it is exactly above the sole plate and that the gap between the timbers is identical to that in the sole plate. .
Fitting vertical studs.
Measure the distance between the top and sole plates at each end, and cut the end studs (using 2 lengths of 50mm x 50mm timbers at each end) slightly longer than this to ensure a tight fit. The back of the end studs may need to be cut away at the bottom so that they clear any existing skirting board and fit flat against the existing wall.
Fix the end studs to the existing walls using screws and plugs if they are masonry, and fix to the plates by skew-nailing - drive nails through the upright at an angle so that they penetrate the plates.
For the intermediate studs, use 75mm x 50mm timber. The length of each intermediate stud should be individually measured to allow for any irregularities in the floor or ceiling, and again cut slightly longer than the dead size.
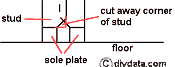 Cut away the inner corner of each stud at both bottom and top to ensure that each stud clears the sole plate (and top plate) timber to which it will not be nailed.
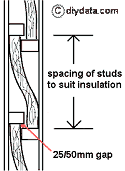 The intermediate studs need to be spaced so that immediately adjacent studs for each side are separated by an air gap of 25 to 50 mm (1 to 2 inch).
The spacing of the studs should be such that adjacent (but one) opposite side studs are just under the width of the insulation being used apart, so that when the insulation is inserted, it snugly fits between the studs.
It is easier to cut any recesses to take light and door noggins before the stud is fixed between the top and sole plates.
Secure each stud to the top and sole plate by skew-nailing into the plates, use two nails per side at both top and bottom.
Use 2 lengths of 50mm x 50mm timber for the studs on either side of the doorway to go from under the top plate to the floor itself, cut recesses (12mm - 1/2in deep) to take the over door lintel. Position the recesses to take account of the height of the door and the door frame which will be built later. Carefully check that these studs are vertical when they are erected, nail through the bottom of the studs into the sole plate and into the top plate.
Fitting the noggins
When all the studs have been erected; measure, cut and fit the noggins on one side of the partition only; unlike the studs, the noggins should be cut to the exact size of the gap. They are also fixed by skew-nailing, and are positioned so that the horizontal edges of the sheet cladding align with the centres of the noggins. However, it is usual to fix plasterboard sheets vertically rather than horizontally, so a full 2440mm long sheet will cover from floor to ceiling in most modern rooms. In this case, noggins can be located halfway between floor and ceiling and staggered up and down by about 150mm. This allows the noggins to be fixed by driving nails through the stud into the ends of the noggins.
Ensure that there is a gap between the back of each noggin and the studs for the other side of the wall.
The noggins for the remaining side of the wall should be fitted after the plasterboard for the first side has been completed and the insulation inserted against it; leaving the noggins until this later stage makes fitting the insulation easier.
If vertical timber planking is to be used for the cladding, position a number of noggins at about 450mm (18 inch) vertical spacing.
The lintel above the door should be fitted into the recesses previously cut in the studs - use 2 pieces of 50mm x 50mm timber.
The basic frame is now complete, and any holes for pipes or cables can be drilled through the timbers. It may be easier to fit these services after one side of the cladding has been fixed. If any heavy objects or wall units are to be fitted to the partition, extra noggins can be fitted to suit.
Support blocks should be fitted to take any switch or socket boxes, position these so that the front of the box will just be flush with the surface of the cladding when fitted.